How it works
If you have your own website, you can show your Muddy shop on one of its pages. Customers browse your products, fill their basket, check out and pay, all without leaving your website.
It works the same way as adding your booking form. You create a Shop component in Muddy, copy its code, and paste the code into a page on your website.
Before you start
Your shop must be open. Muddy only offers the Shop component while your shop is open and your Muddy subscription is active. If you haven't opened your shop yet, see Setting up your online shop.
Creating your shop component
- Click Settings in the left-hand menu.
- Click Website embedding. This opens the Embeddable components page.
- Click Create component.
- In Name (1), type a name that helps you recognise it, such as Website shop. Only you see this. If you leave it blank, Muddy calls it Shop.
- Under Component type, click Shop (2). If Shop isn't there, your shop isn't open yet (see Before you start).
- Choose how your shop looks. Each setting is explained in Choosing how your shop looks.
- Click Create component (3).
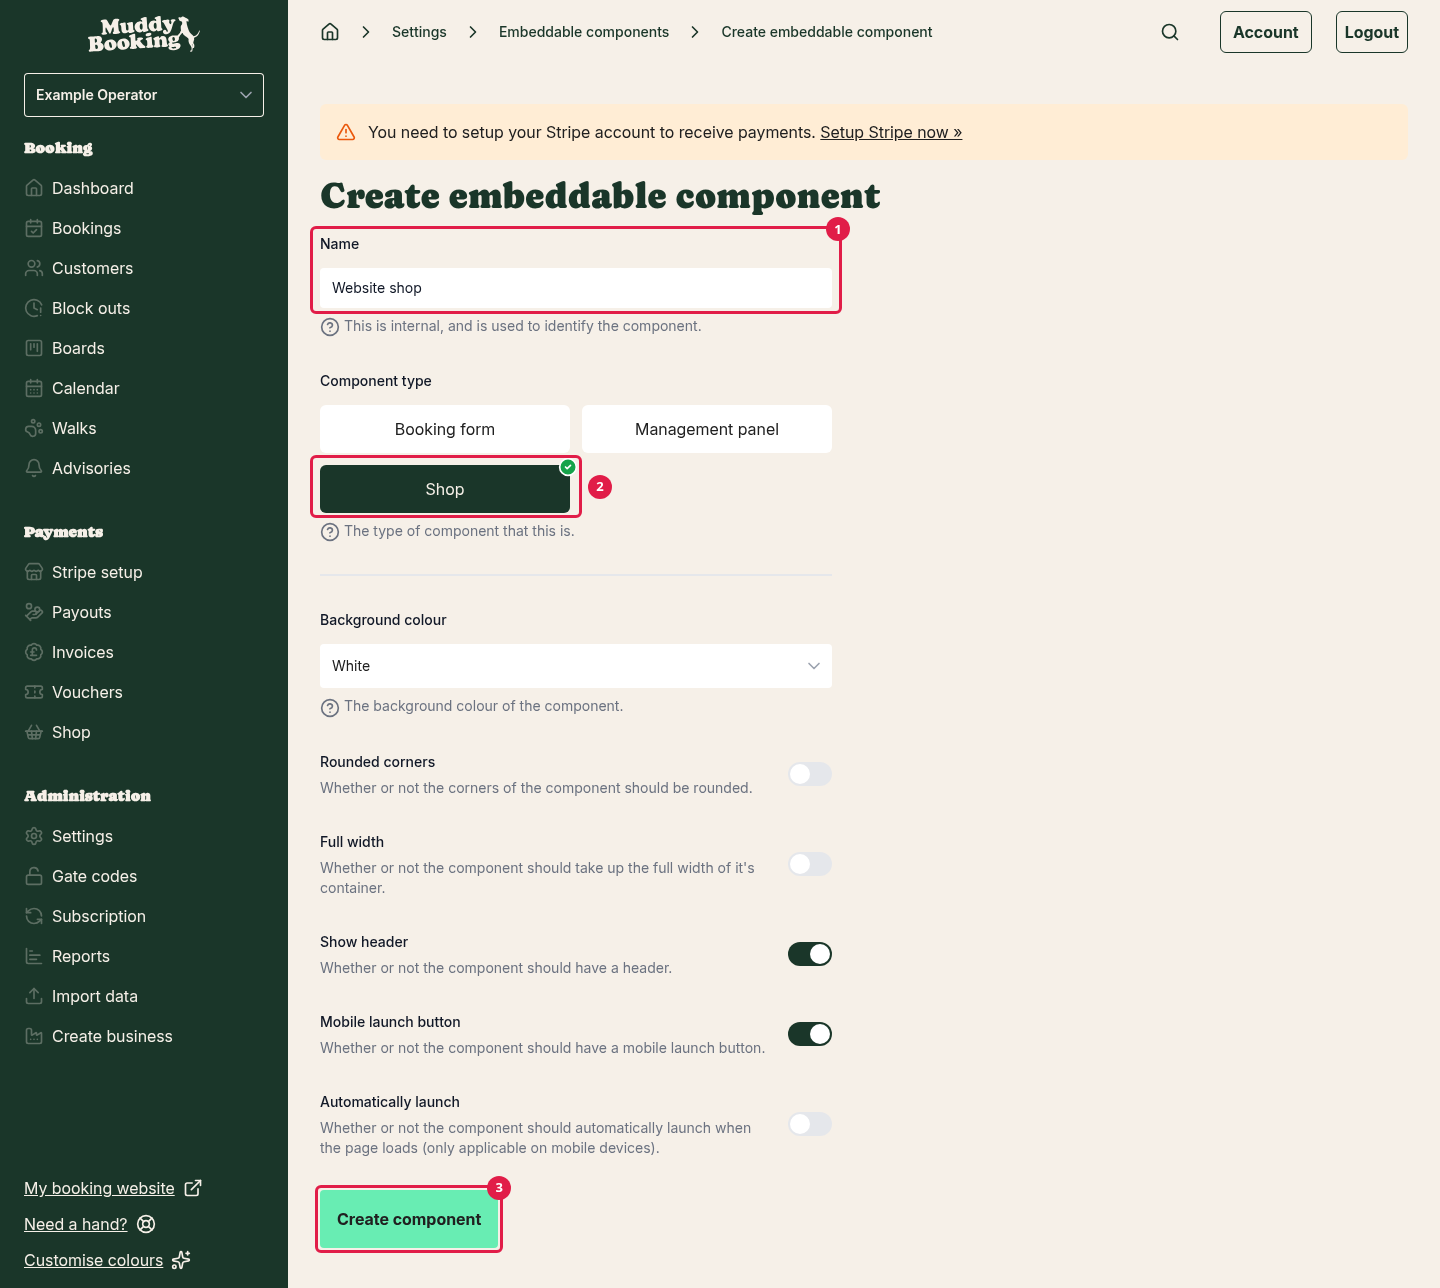
Muddy takes you back to the Embeddable components page. Your new component is in the list, with Shop as its type.
Choosing how your shop looks
These settings change how the shop sits on your page. Show header and Mobile launch button start switched on, and the others start switched off. You can change them later without copying the code again (see Changing your shop component).
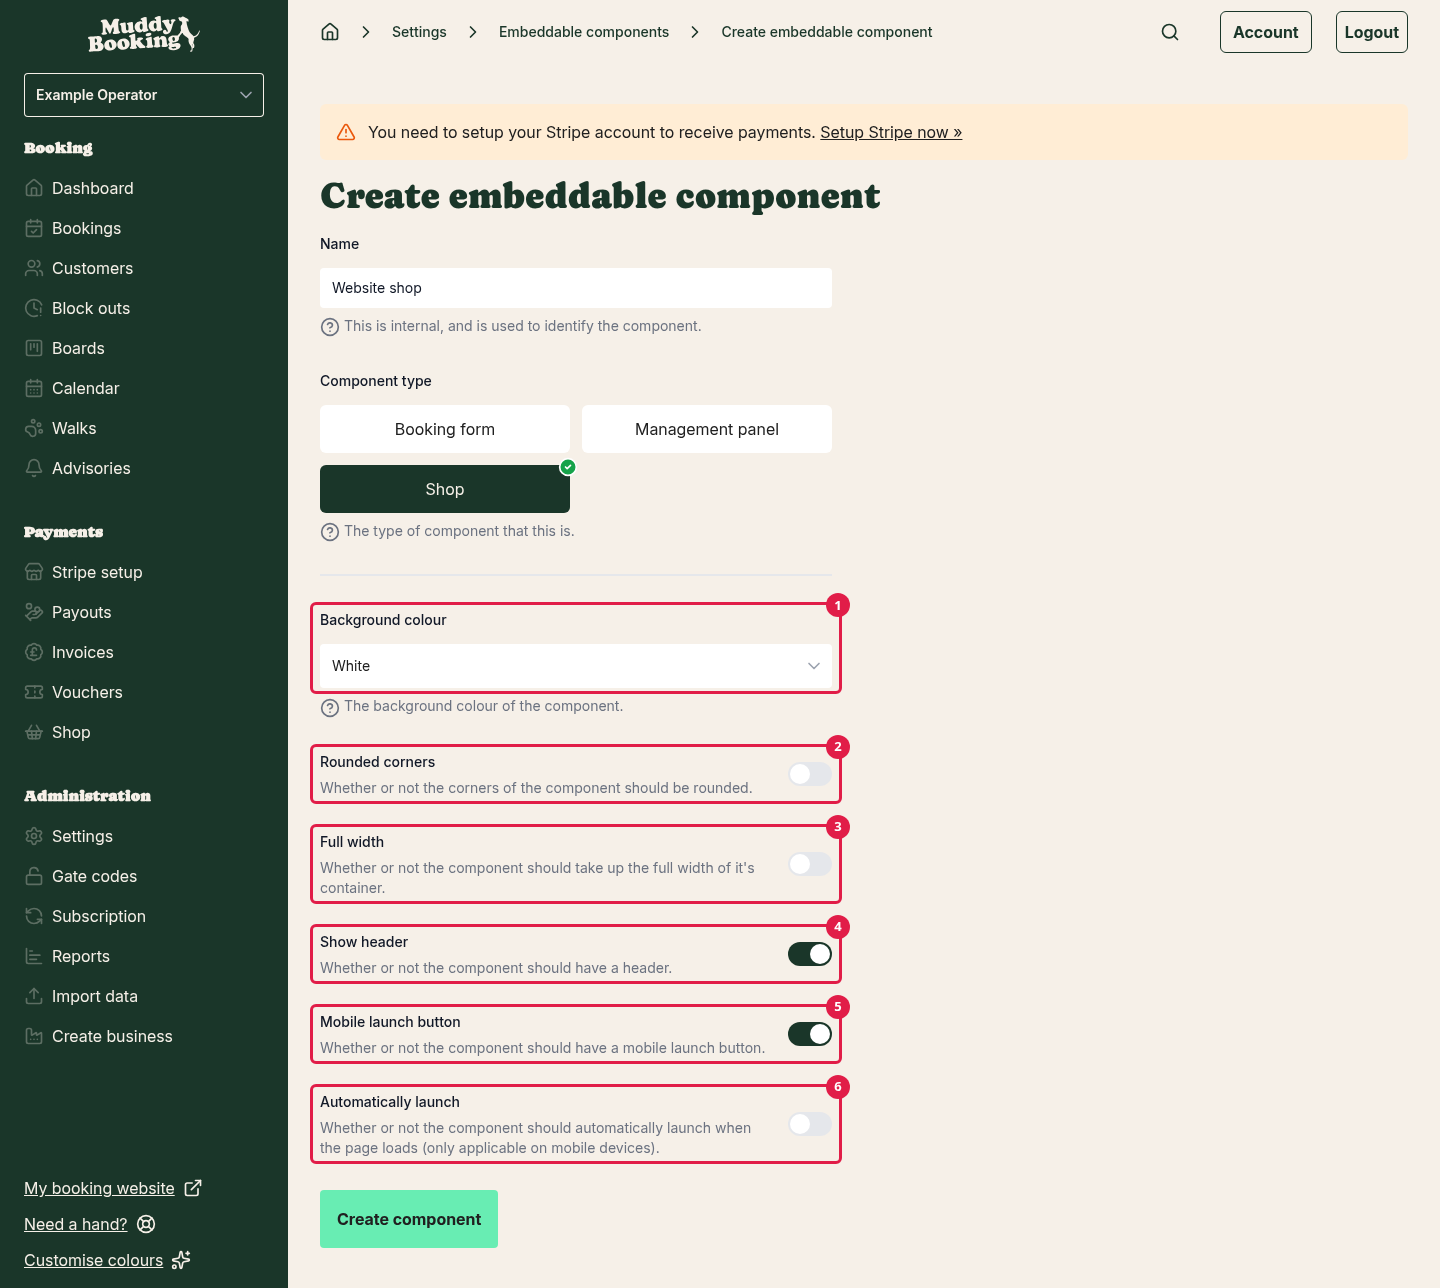
Background colour (1)
Choose one from the menu:
- White: the shop and the area around it have a solid, light background. This is the default, and the safest choice if you're not sure.
- Transparent: the shop has no background, so your website's own background shows through. The shop's text is dark, so only choose this if your page has a light background.
- White panel, transparent surround: the shop itself keeps a white background, so it's always easy to read. The area around it, behind your logo and along the bottom, shows your website's background. This suits a page with a coloured or dark background.
Rounded corners (2)
Switch this on to give the shop rounded corners, or leave it off for square corners. Pick whichever matches the boxes and pictures on the rest of your website.
Full width (3)
- Off: the shop has a maximum width and sits in the middle of the space you put it in, so it doesn't stretch too wide on big screens.
- On: the shop stretches to fill the whole width of that space.
Where customers see the Open button, this setting also makes it stretch across the space.
Show header (4)
When this is on, the top of the shop shows your logo (or your business name, if you haven't uploaded a logo) and a cover photo. This is your default cover photo, except on a collection's own page, which shows that collection's cover image if it has one. Switch it off if your page already shows your logo and a large picture just above the shop, so customers don't see them twice.
On a phone, the cover photo always shows once the shop is open full screen, whatever this setting says.
Mobile launch button (5)
On phones, your shop doesn't sit inside your page. Instead, customers see an Open button. When they tap it, the shop opens full screen over your page. They tap the cross in the top-right corner to close it and go back to your page.
This depends on how wide the space for your shop is, not on the device. If you paste the code into a narrow space, such as the middle column of many WordPress pages, customers on a computer see the Open button too. To show the whole shop on computers, the space needs to be at least as wide as a tablet held upright. Whoever looks after your website can widen it.
Leave this on unless you've added your own button to open the shop. If you switch it off, customers who would see the Open button won't see your shop at all, unless Automatically launch is on or you've added your own button. Whoever looks after your website can add one by following Launching the embed from your own button.
Automatically launch (6)
This only affects customers who would see the Open button, such as on phones. When it's on, your shop opens full screen as soon as the page loads, so customers don't need to tap Open. It suits a page that's only for your shop. Leave it off if the page has other things customers should see first.
Adding the shop to your website
First, copy your shop component's code:
- Click Settings in the left-hand menu.
- Click Website embedding.
- Find your shop component in the list.
- Click Copy HTML next to it. The button changes to Copied! for a moment, to show the code is ready to paste.
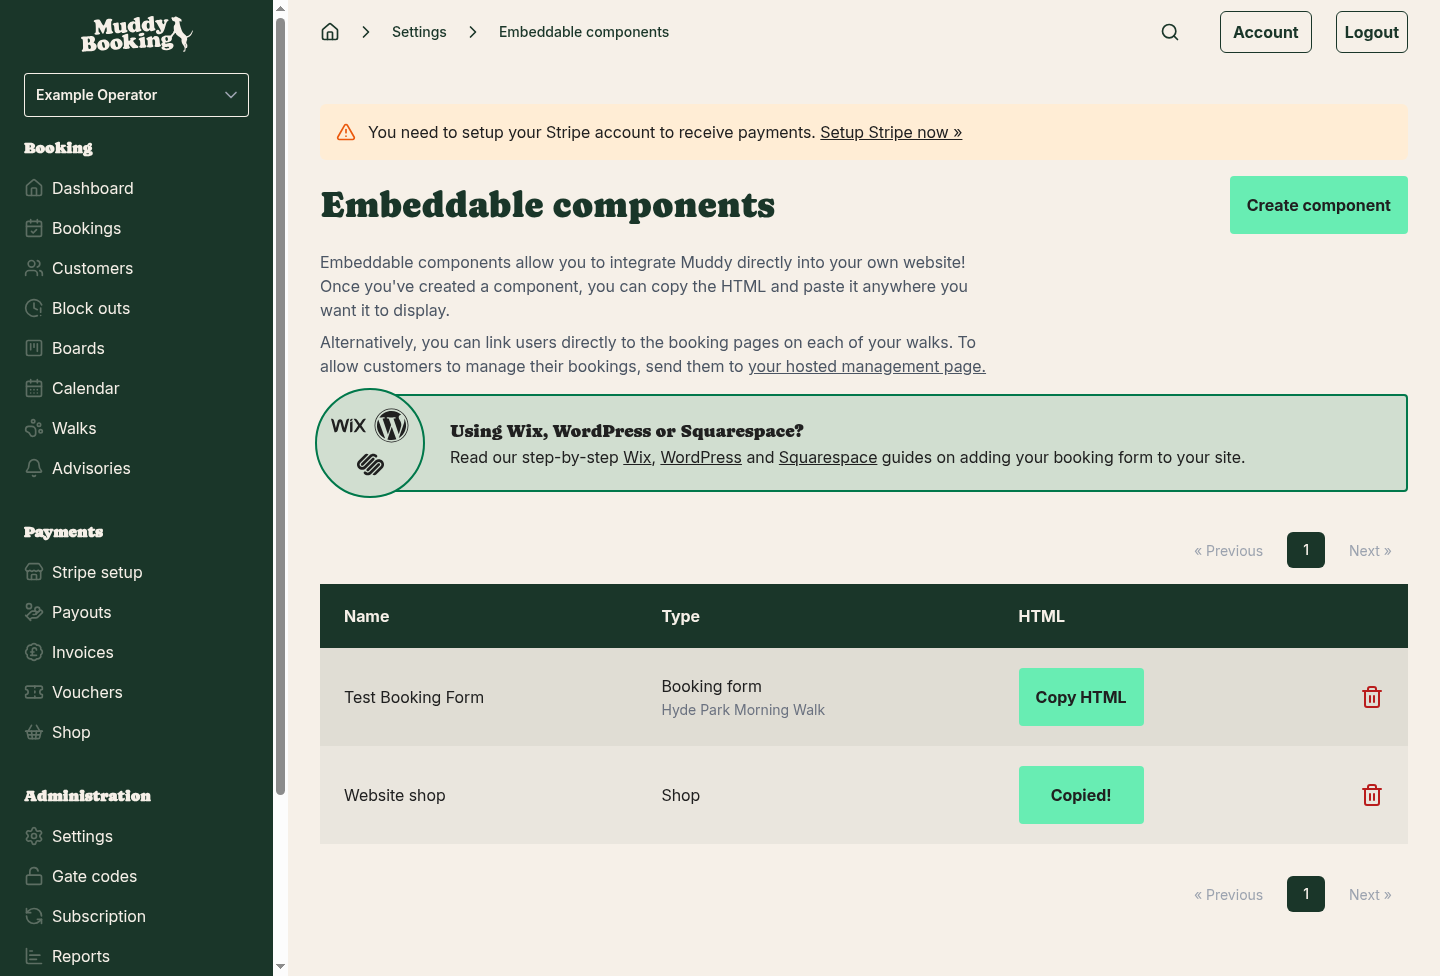
Next, paste the code into the page on your website where you want your shop to appear. The steps are the same as for the booking form, so follow the guide for your website:
Where the guide mentions the booking form, use your shop code instead. When you've saved the page, customers see your shop there, or an Open button on phones, not a Book now button (see What your customers see). On another website builder, look for a block that lets you add HTML, code or an embed, and paste the code into that.
Tip: give your shop a page of its own, such as a page called Shop, and add that page to your website's menu. That way, customers can always find it.
If your website is on Wix
We don't recommend embedding on Wix, for the same reasons as the booking form (see Adding your booking form to Wix). Add a button that links to your shop instead:
- Click Shop in the left-hand menu.
- Click View your shop. Your shop opens in a new tab.
- Copy the address from your browser's address bar.
- Follow the steps in Adding a booking button to your Wix page, and paste your shop's address instead of your booking form's.
Taking Apple Pay and Google Pay on your website
When you show Muddy on your own website, Muddy asks you to add your website's address as a payment domain. This lets payment options such as Apple Pay and Google Pay work in your shop there. If you've already done this for your booking form, you can skip it.
- Click Settings in the left-hand menu.
- Click Payment domains.
- Click Add (1).
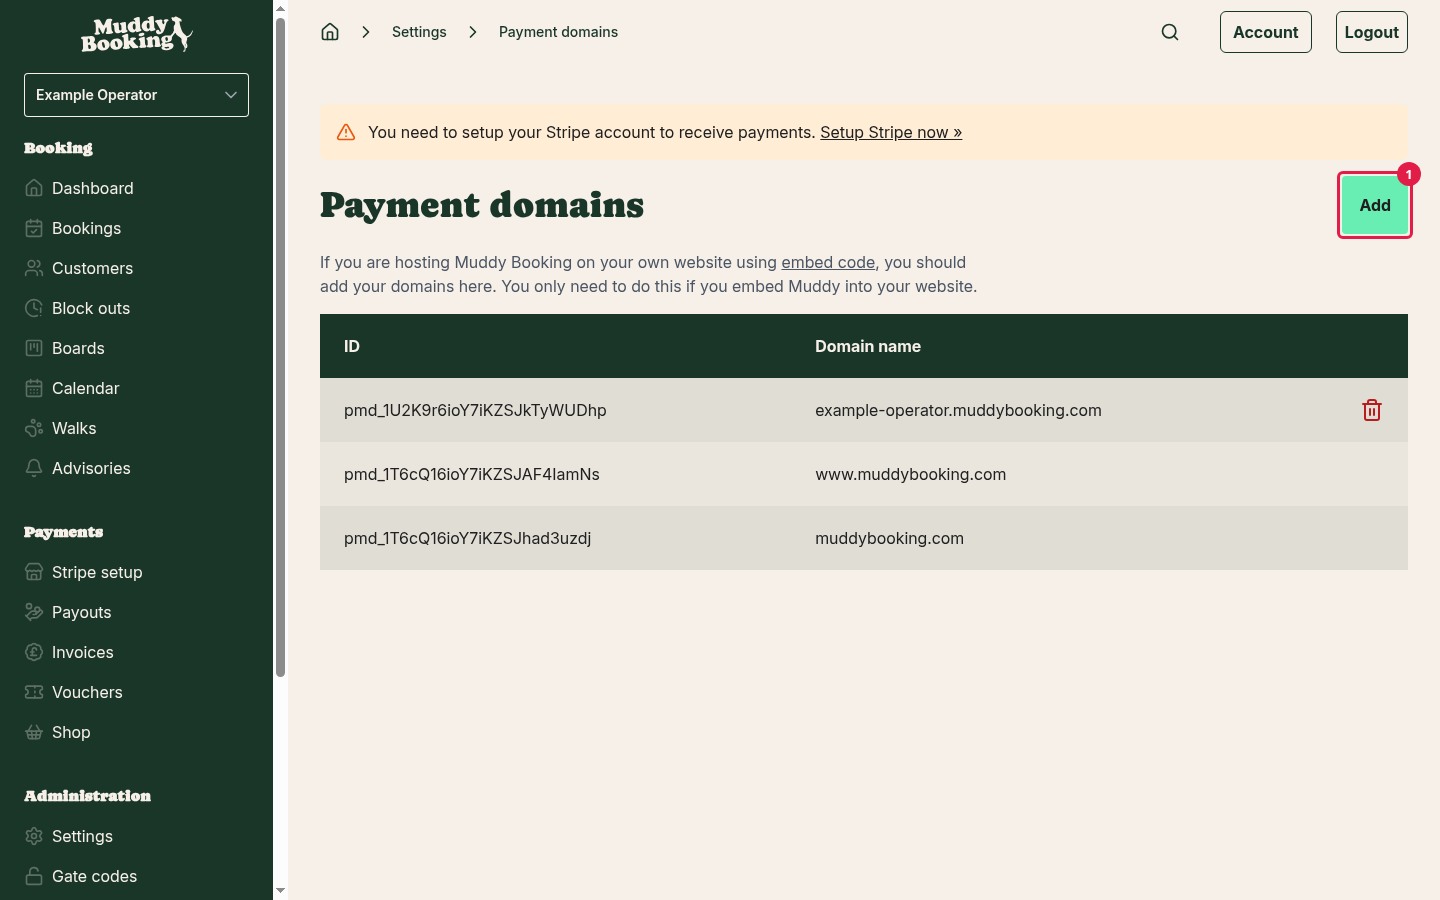
- In Domain name, type your website's address as it shows in your browser, such as www.example.com. Leave out the https:// at the start.
- Click Add domain.
What your customers see
- On a computer or tablet, your shop sits inside your page, with your collections, your products and a basket, as long as the space you pasted the code into is wide enough (see Mobile launch button above). It grows and shrinks to fit, so customers scroll your page as normal.
- On a phone, or in a narrow space, customers see an Open button, unless you've switched off Mobile launch button. Tapping it opens the shop full screen.
It's the same shop as on your Muddy website, with the same products, prices, delivery options and discounts. For a walk-through of browsing, the basket and checkout, see What your customers see when they shop.
The menu at the top of the shop also has Book now and Your bookings, so customers can book with you from there too. Links to other pages of your Muddy website, such as Contact us, are left out, because your own website has its own.
Changing your shop component
- Click Settings in the left-hand menu.
- Click Website embedding.
- Click your shop component's name.
- Change the settings you want.
- Click Save changes.
You don't need to copy the code again. Your website picks up the changes by itself, but it can take a few minutes for them to show.
To remove your shop component, click the red bin icon at the end of its row, then click Delete it.
Warning: deleting a component can't be undone. Your shop disappears from every page you pasted its code into. If you create a new component later, you'll need to copy and paste its new code.
If you close your shop
You can close your shop at any time (see Closing your shop). While it's closed:
- Your shop no longer shows on your website, so customers can't browse it or buy from it there.
- Your shop component stays in your list, still set to Shop. You can still change its settings and save them.
- You can't create a new Shop component. The Shop choice comes back once your shop is open again.
You don't need to change anything on your website. When you open your shop again, it shows on your website again by itself.
Tip: while your shop is closed, hide the page it's on, or take the page out of your website's menu, so customers don't land on a page with nothing to buy.
The same happens if your Muddy subscription lapses. Once your subscription is active again, your shop comes back on your website.