Getting to your products
- Click Shop in the left-hand menu.
- Click Products.
If you haven't opened your shop yet, the Shop page shows your setup steps instead. Use Add a product or Review products there. See Setting up your shop for the first time.
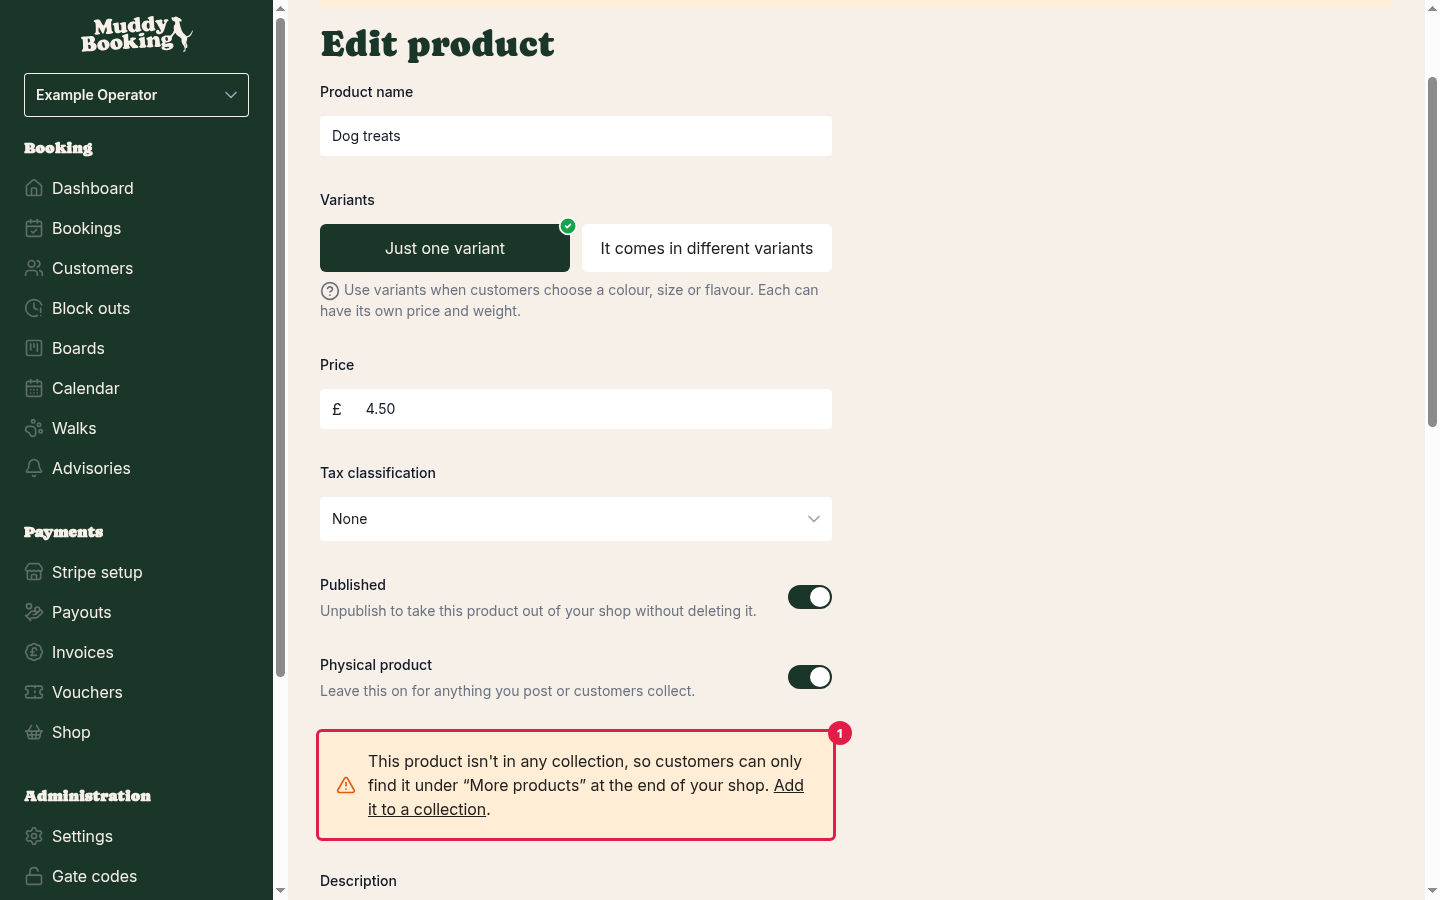
The Products page lists everything you sell. Products you haven't published yet have a Draft (1) badge. The Stock (2) column shows how many you have, if you track stock for that product (see Tracking stock).
If you've made collections, click Filters, then use Collections to show only the products in the collections you pick.
To check how a product looks to customers, click View in shop (3) next to it. This works for drafts too, and before your shop is open.
Adding a product
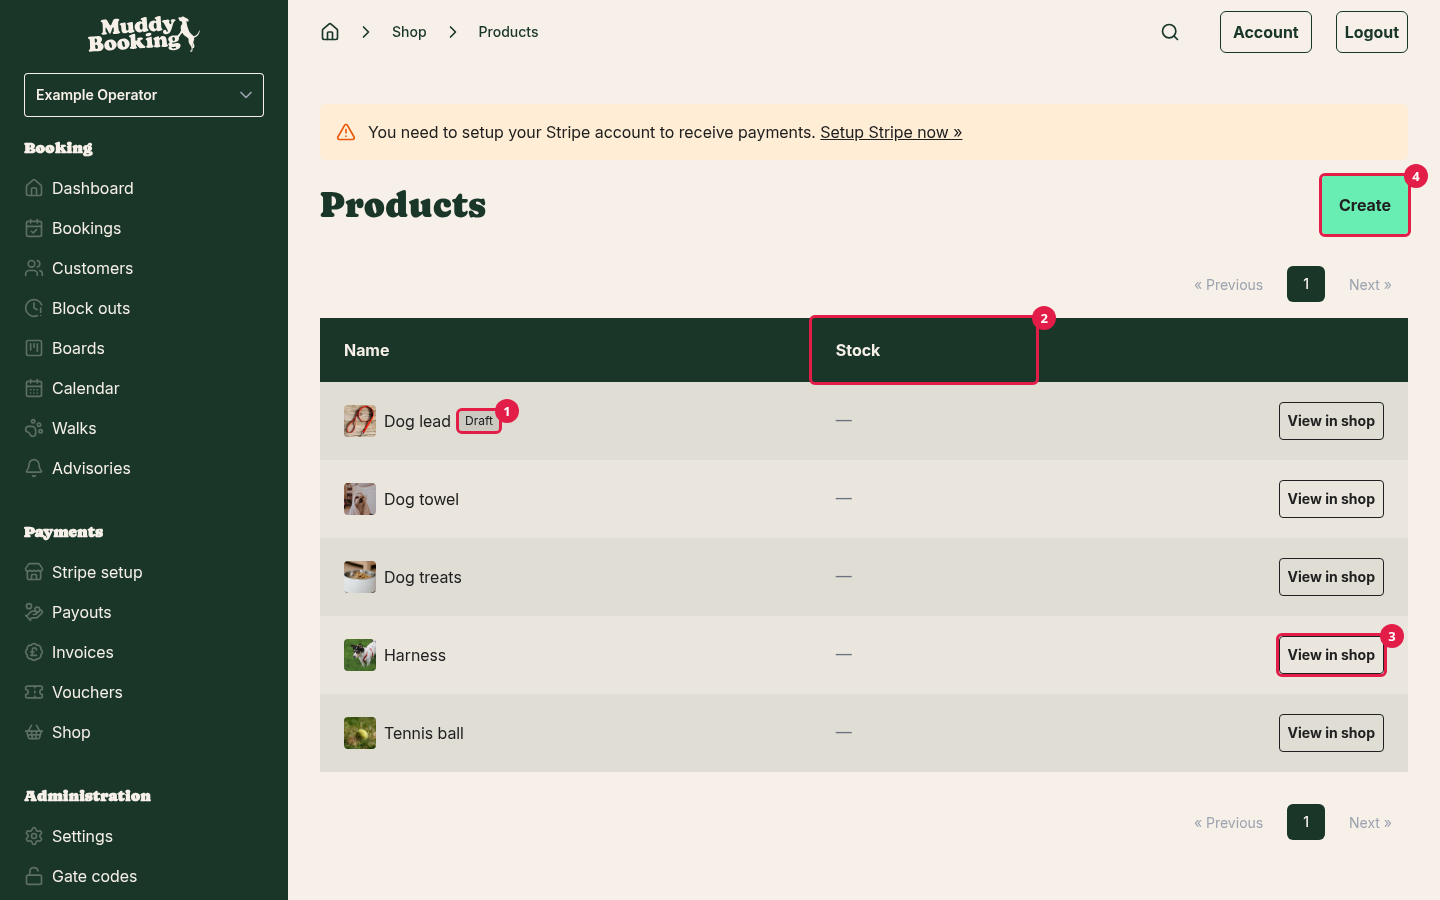
- On the Products page, click Create (4).
- Under Product type, choose Standard product (1).
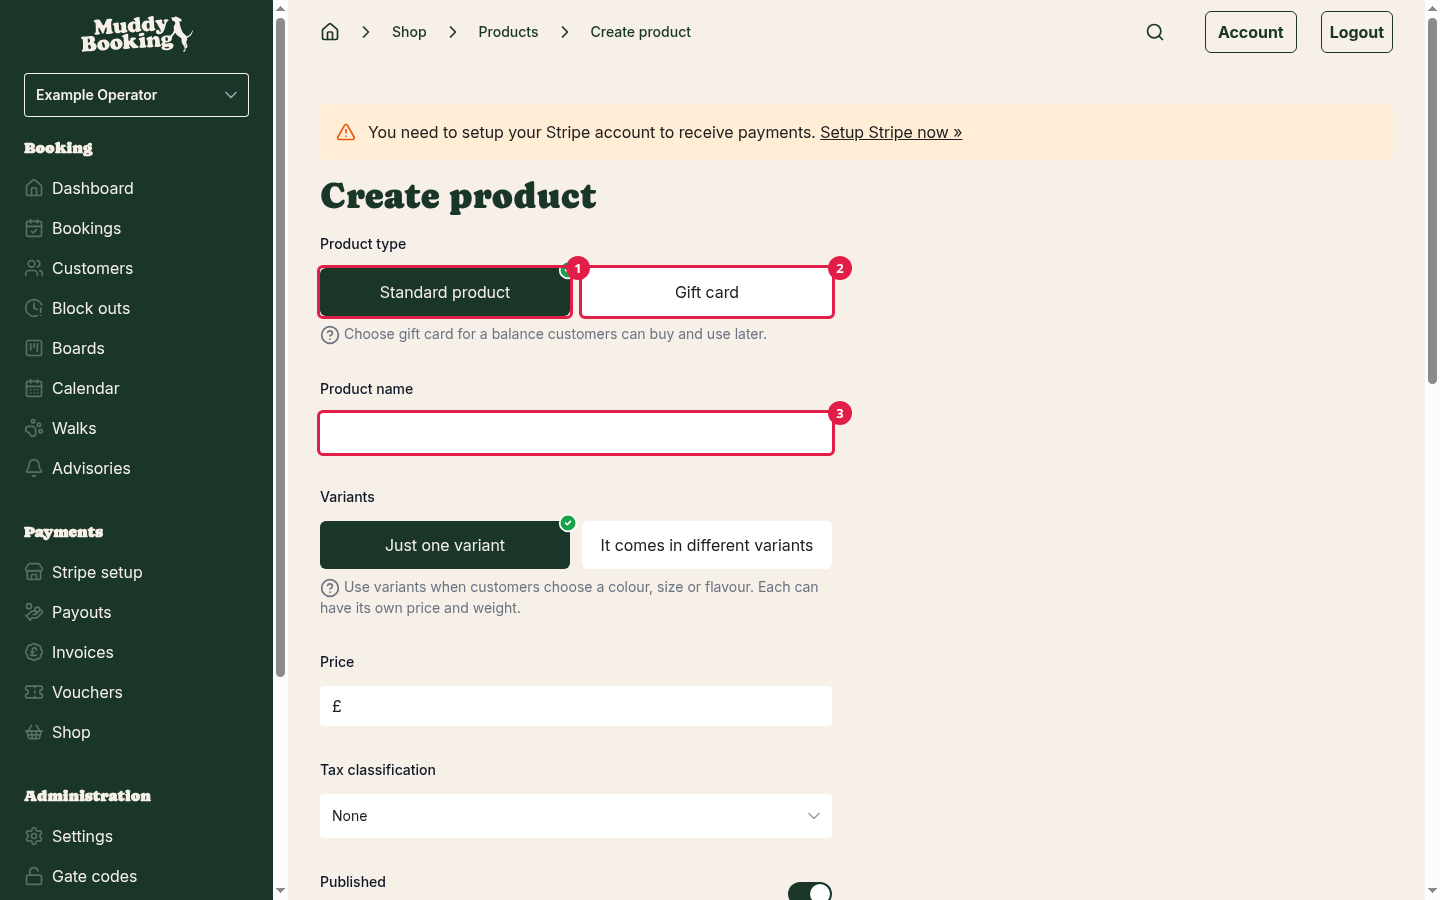
Choose Gift card (2) instead if you want to sell a balance customers can spend later. Gift cards work a little differently, so they have their own article: Selling gift cards. You can't change the product type after you've created the product.
Then fill in the details below, starting with the Product name (3).
Product name
What customers see in your shop, in their basket and on their receipt.
Leave Variants set to Just one variant unless the product comes in different colours or sizes (see below).
Price
What the customer pays for one of this product.
Tax classification
If you're VAT registered, choose the VAT rate that applies to this product. If you're not, leave it as None.
If you choose a VAT rate, a Prices include tax switch appears. Leave it on if the price you entered already includes VAT, which is usual for things you sell to the public.
Published
Leave this on to show the product in your shop. Switch it off to hide the product without deleting it. This is useful for seasonal items, or for a product you're still working on.
Physical product
Leave this on for anything you post or hand over, including things customers collect from you. Switch it off only for things that never need delivering. Muddy only asks customers for a delivery address when something in their order is physical.
Description
Shown on the product's own page. Use it for anything a customer would want to know before buying, like size, ingredients or care instructions. Use the buttons above the box to add headings, bold or italic text, and lists.
Images
Add photos of the product. The first image is the main one, marked Primary, and it's the one shown on your shop front. Customers can look through the rest on the product's page. Use the arrows on each image to change the order.
SKU
A short code to identify the product, useful if you keep stock records elsewhere. Muddy suggests one as you type the name, but you can change it. Each product needs a different SKU.
Weight (grams)
Only needed if you charge for delivery by weight. If any of your delivery rates use weight, set a weight on every physical product. Otherwise customers can't have a basket containing that product delivered by that method.
When you're done, click Create product.
If you're adding a product while setting up your shop, the button says Save and continue and takes you to the next setup step.
Products that come in different colours or sizes
If a product comes in more than one version, such as a harness in three sizes and two colours, you don't need to create a separate product for each. Add options instead, and Muddy creates a variant for each combination.
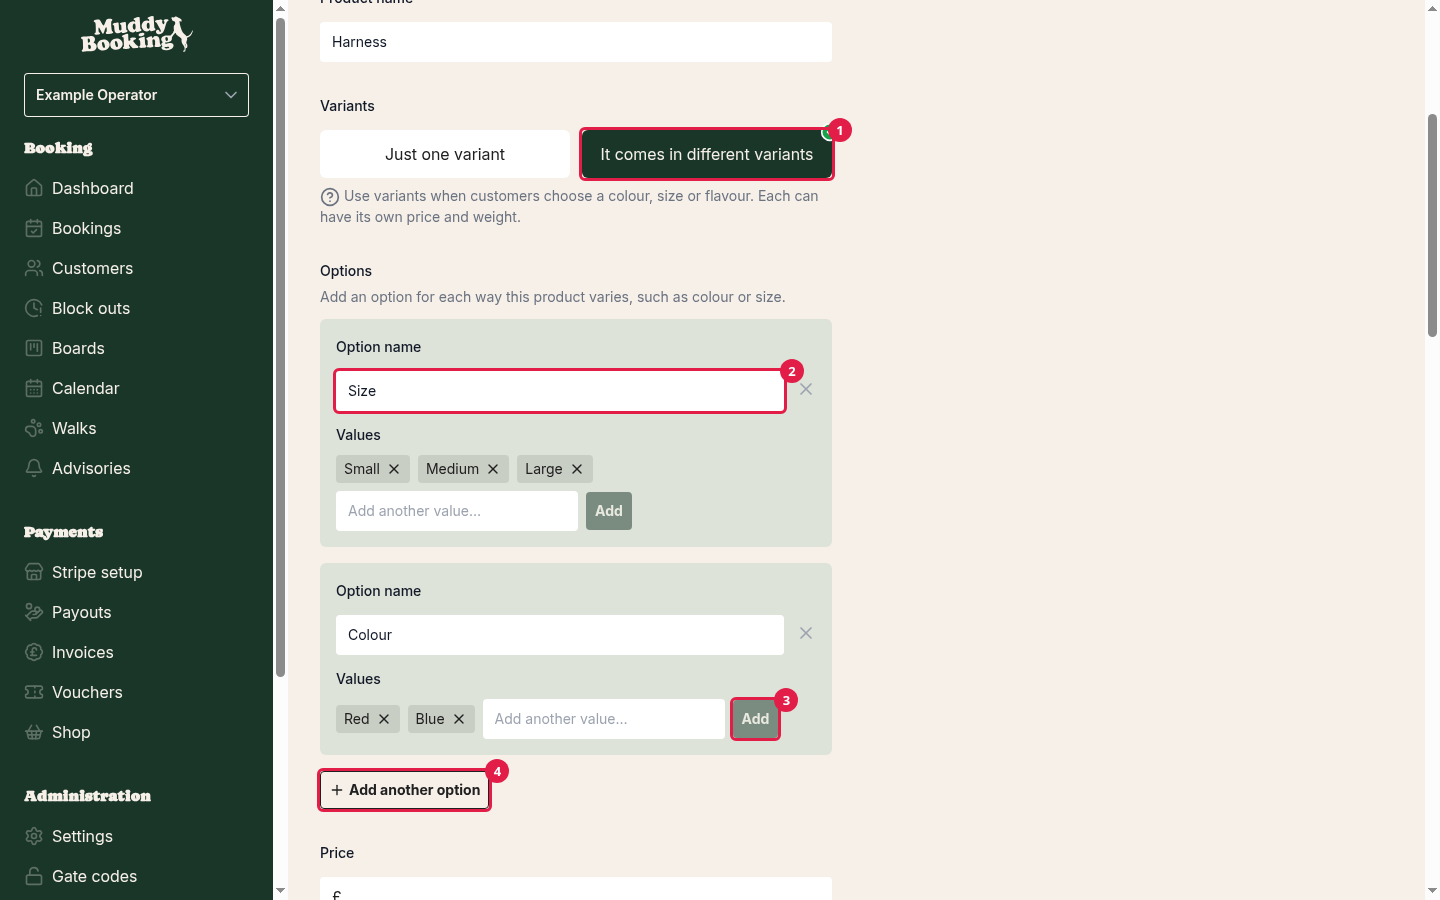
- Under Variants, choose It comes in different variants (1).
- Click Add an option.
- Type an Option name (2), such as Size.
- Add each value, such as Small, Medium and Large. Click Add (3) after each one.
- To add another way the product varies, click Add another option (4). For example, add Colour with the values Red and Blue.
As you type, Muddy suggests option names and values you've used on other products. Picking one of these keeps your shop consistent.
You can add up to three options per product, and a product can have up to 100 variants.
The variants table
Muddy lists every combination in the Variants table. In the example above, you'd get six variants: Small Red, Small Blue, Medium Red, and so on.
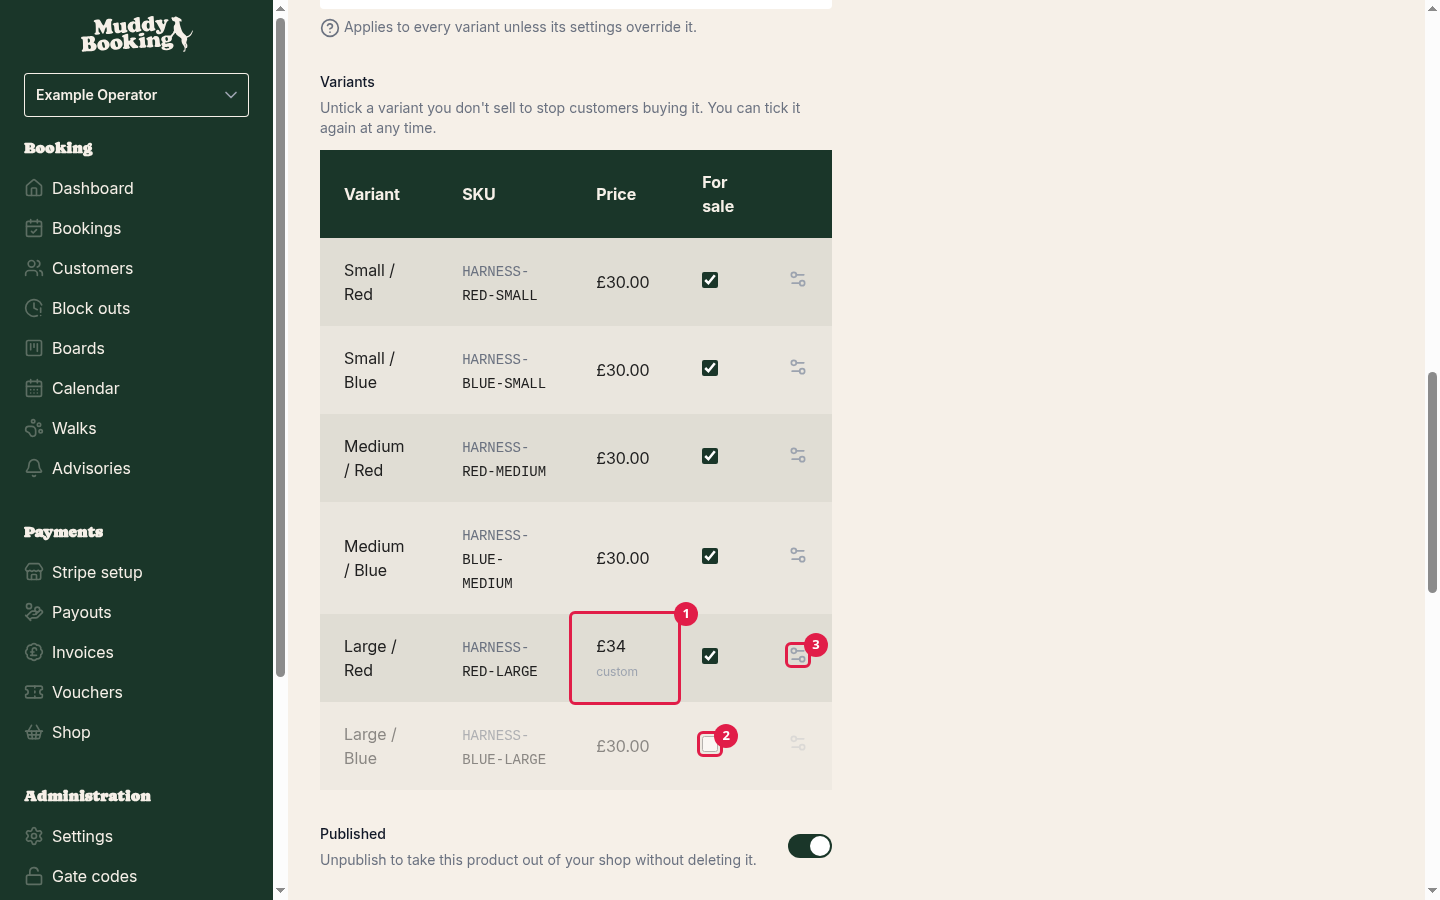
- Every variant sells at the product's price unless you change it. A variant with its own price, tax or weight shows custom (1) with its price.
- Untick For sale (2) on a variant you don't sell, such as a colour you don't stock in large. Customers won't be able to choose that combination. You can tick it again at any time.
- To give one variant a different price, tax or weight, click its settings icon (3).
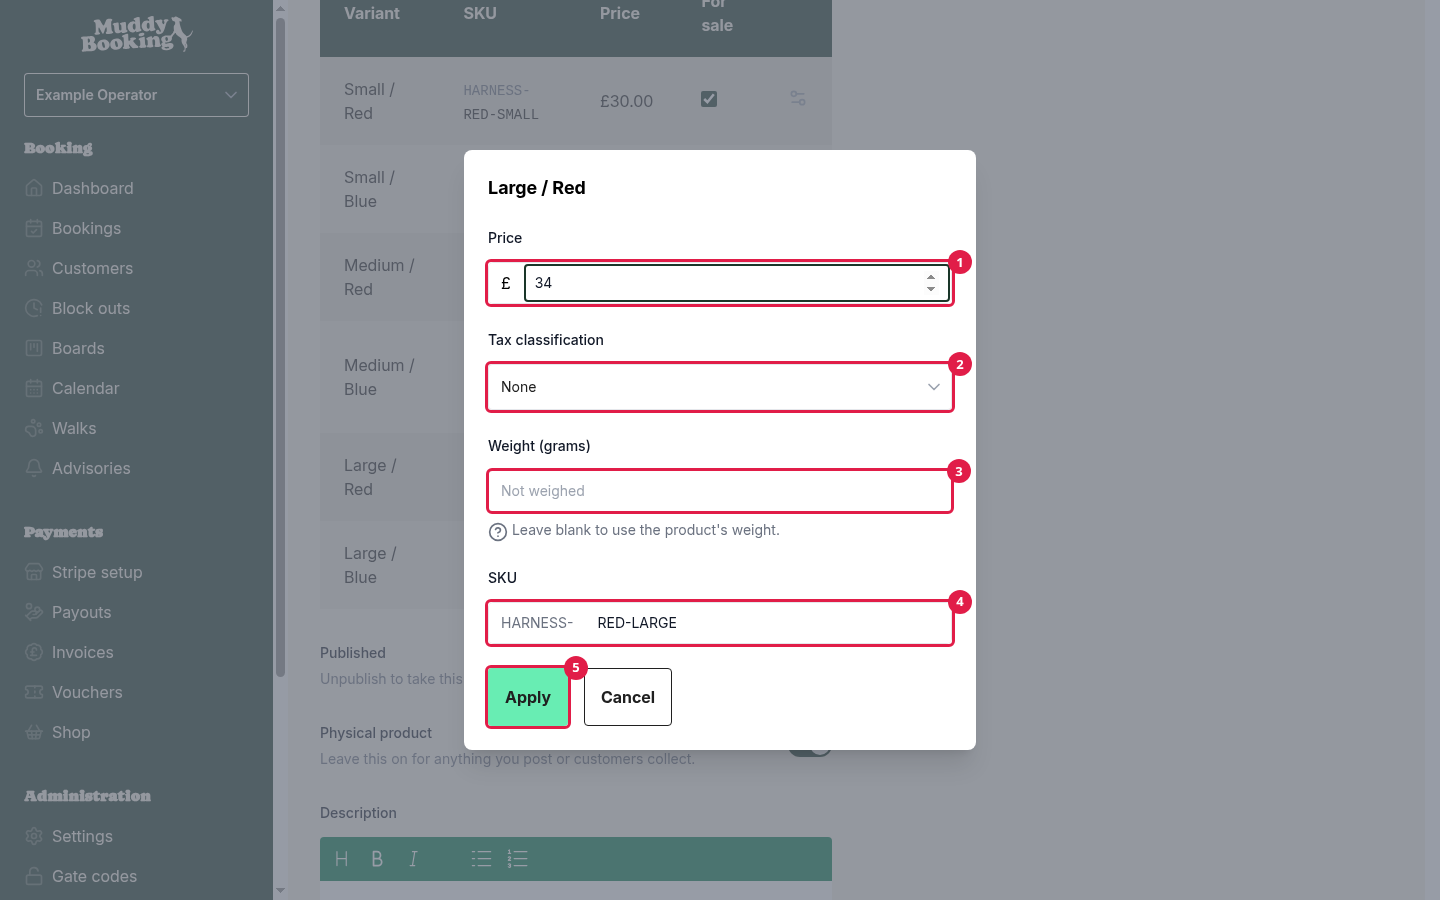
In a variant's settings, change its Price (1), or set its own Tax classification (2), Weight (grams) (3) and SKU (4) ending. Tax starts as the product's rate. Leave the weight blank to use the product's weight. Click Apply (5) to keep your changes.
With variants, the product's SKU becomes an SKU prefix. Muddy adds the variant's values to the end to make each variant's code.
You must leave at least one variant for sale. Otherwise the product has nothing to sell.
What customers see
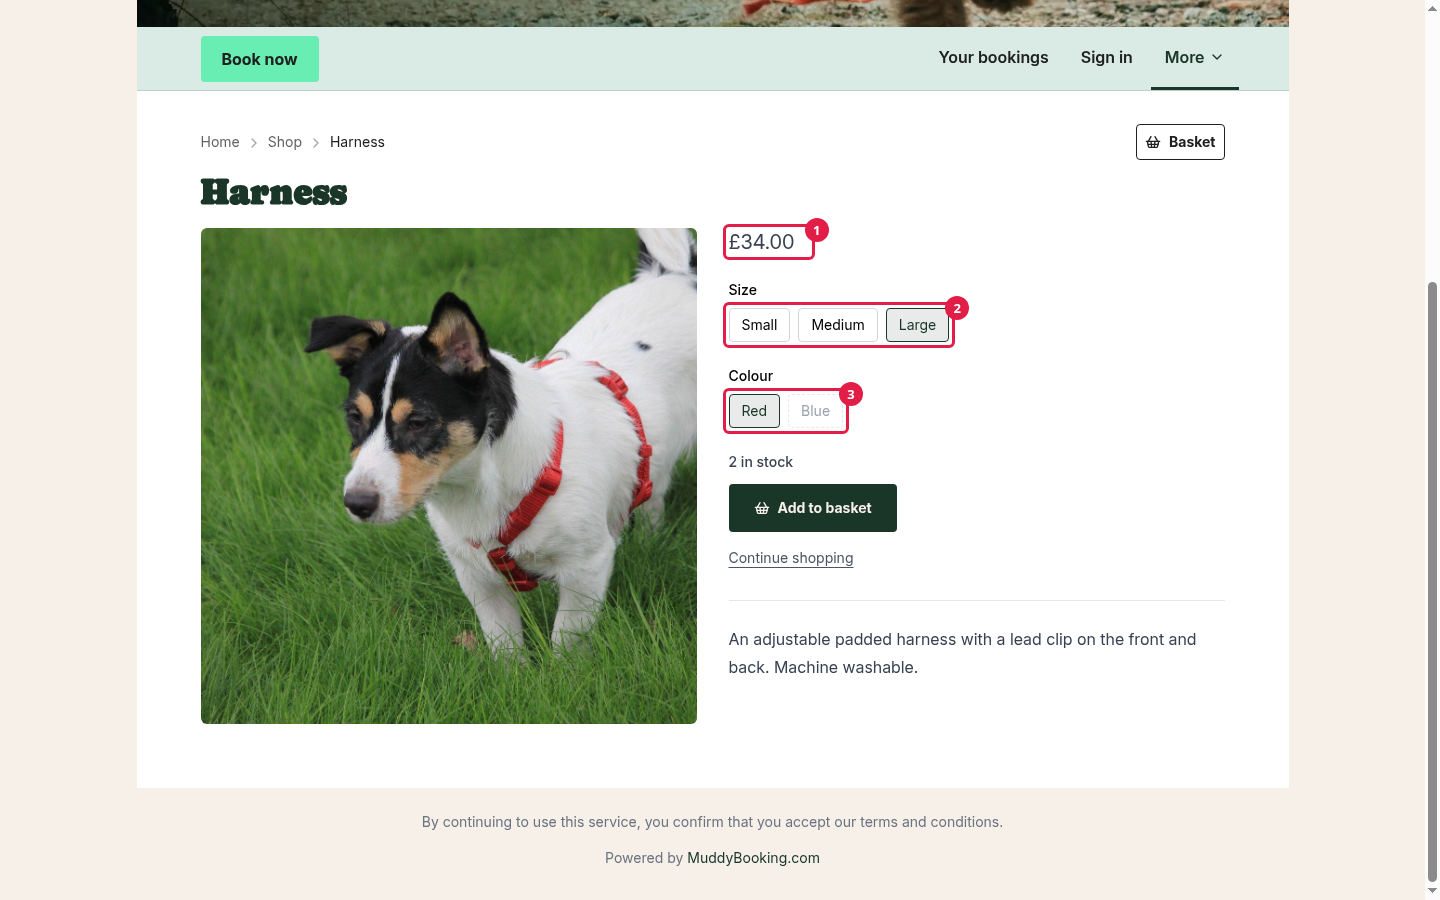
On your shop front, the product shows From the lowest variant price. On the product's own page, the first available variant is already chosen, and customers pick from buttons for each option (2). The price (1) changes as they choose. Combinations you don't sell, or that are out of stock, are greyed out (3).
Switching back to a single variant
If you change a product with variants back to Just one variant, Muddy stops selling the other variants. Orders already placed aren't affected.
Muddy keeps your old options and variants. If you switch back to It comes in different variants later, they come back unticked. Tick the ones you want to sell again. They keep their old prices and SKUs.
Renaming an option
If you rename an option or one of its values, the change applies to every product that uses it. So if you rename Colour to Colours, every product with a colour option changes too.
- Click Shop in the left-hand menu.
- Click Options.
- Click the option you want to change.
- Change the Option name (2) or any of its Values (3).
- Click Save changes (5).
If you haven't opened your shop yet, click Settings in the left-hand menu, then Options, instead of steps 1 and 2.
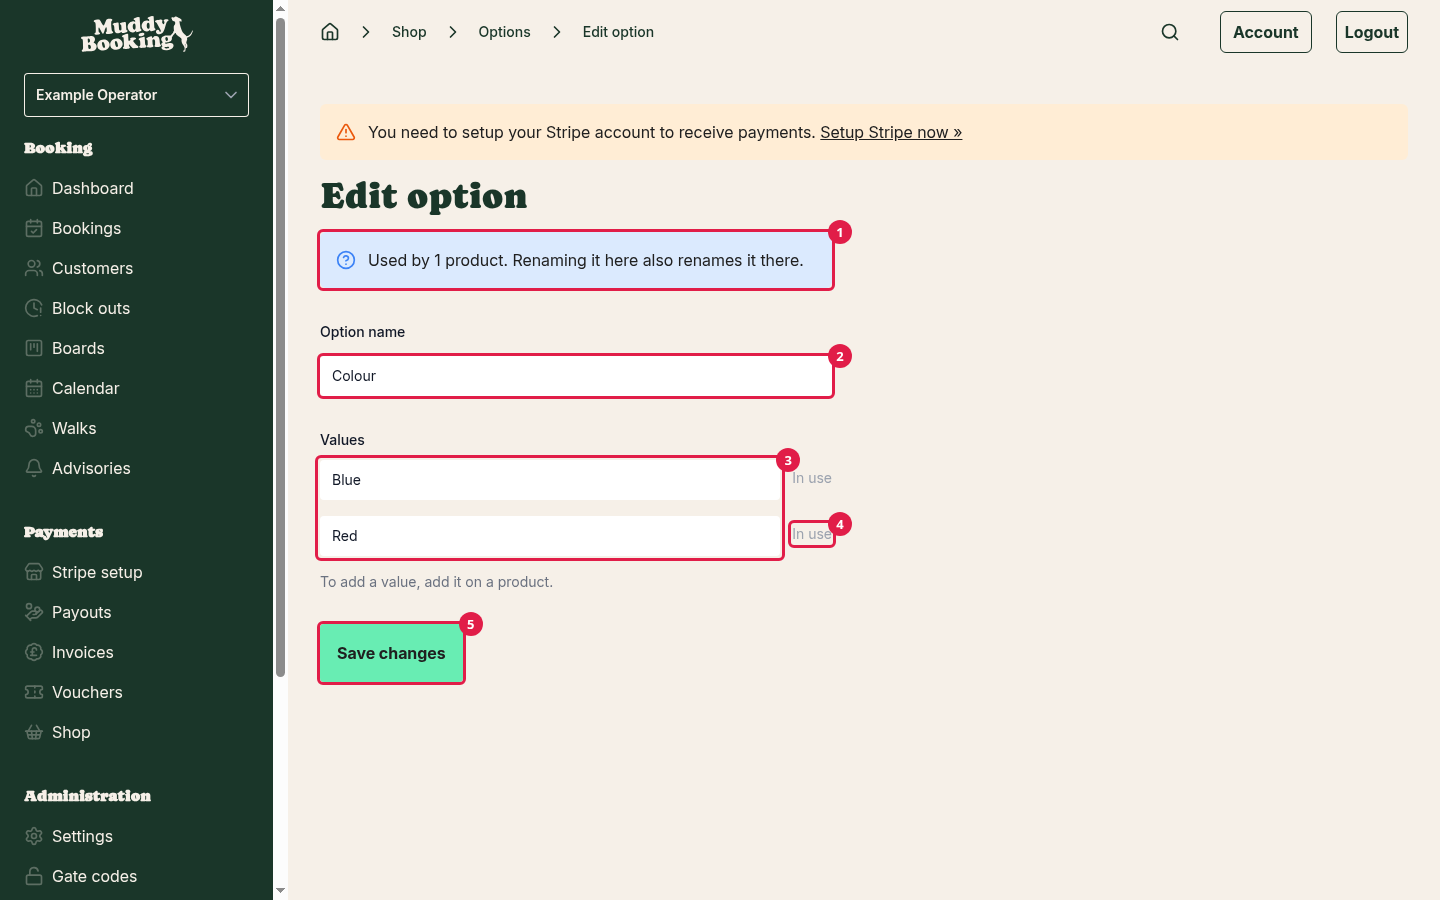
The top of the page (1) tells you how many products use the option, so you know how far the change will reach.
On this page you can't add new values. Add them on a product instead, and they'll appear here.
You can only remove a value if no product uses it. Values that are still used show In use (4). Take the value off those products first, including any variants you've unticked.
You can only delete a whole option once no products use it.
Taking a product off sale
There are two ways to stop selling something.
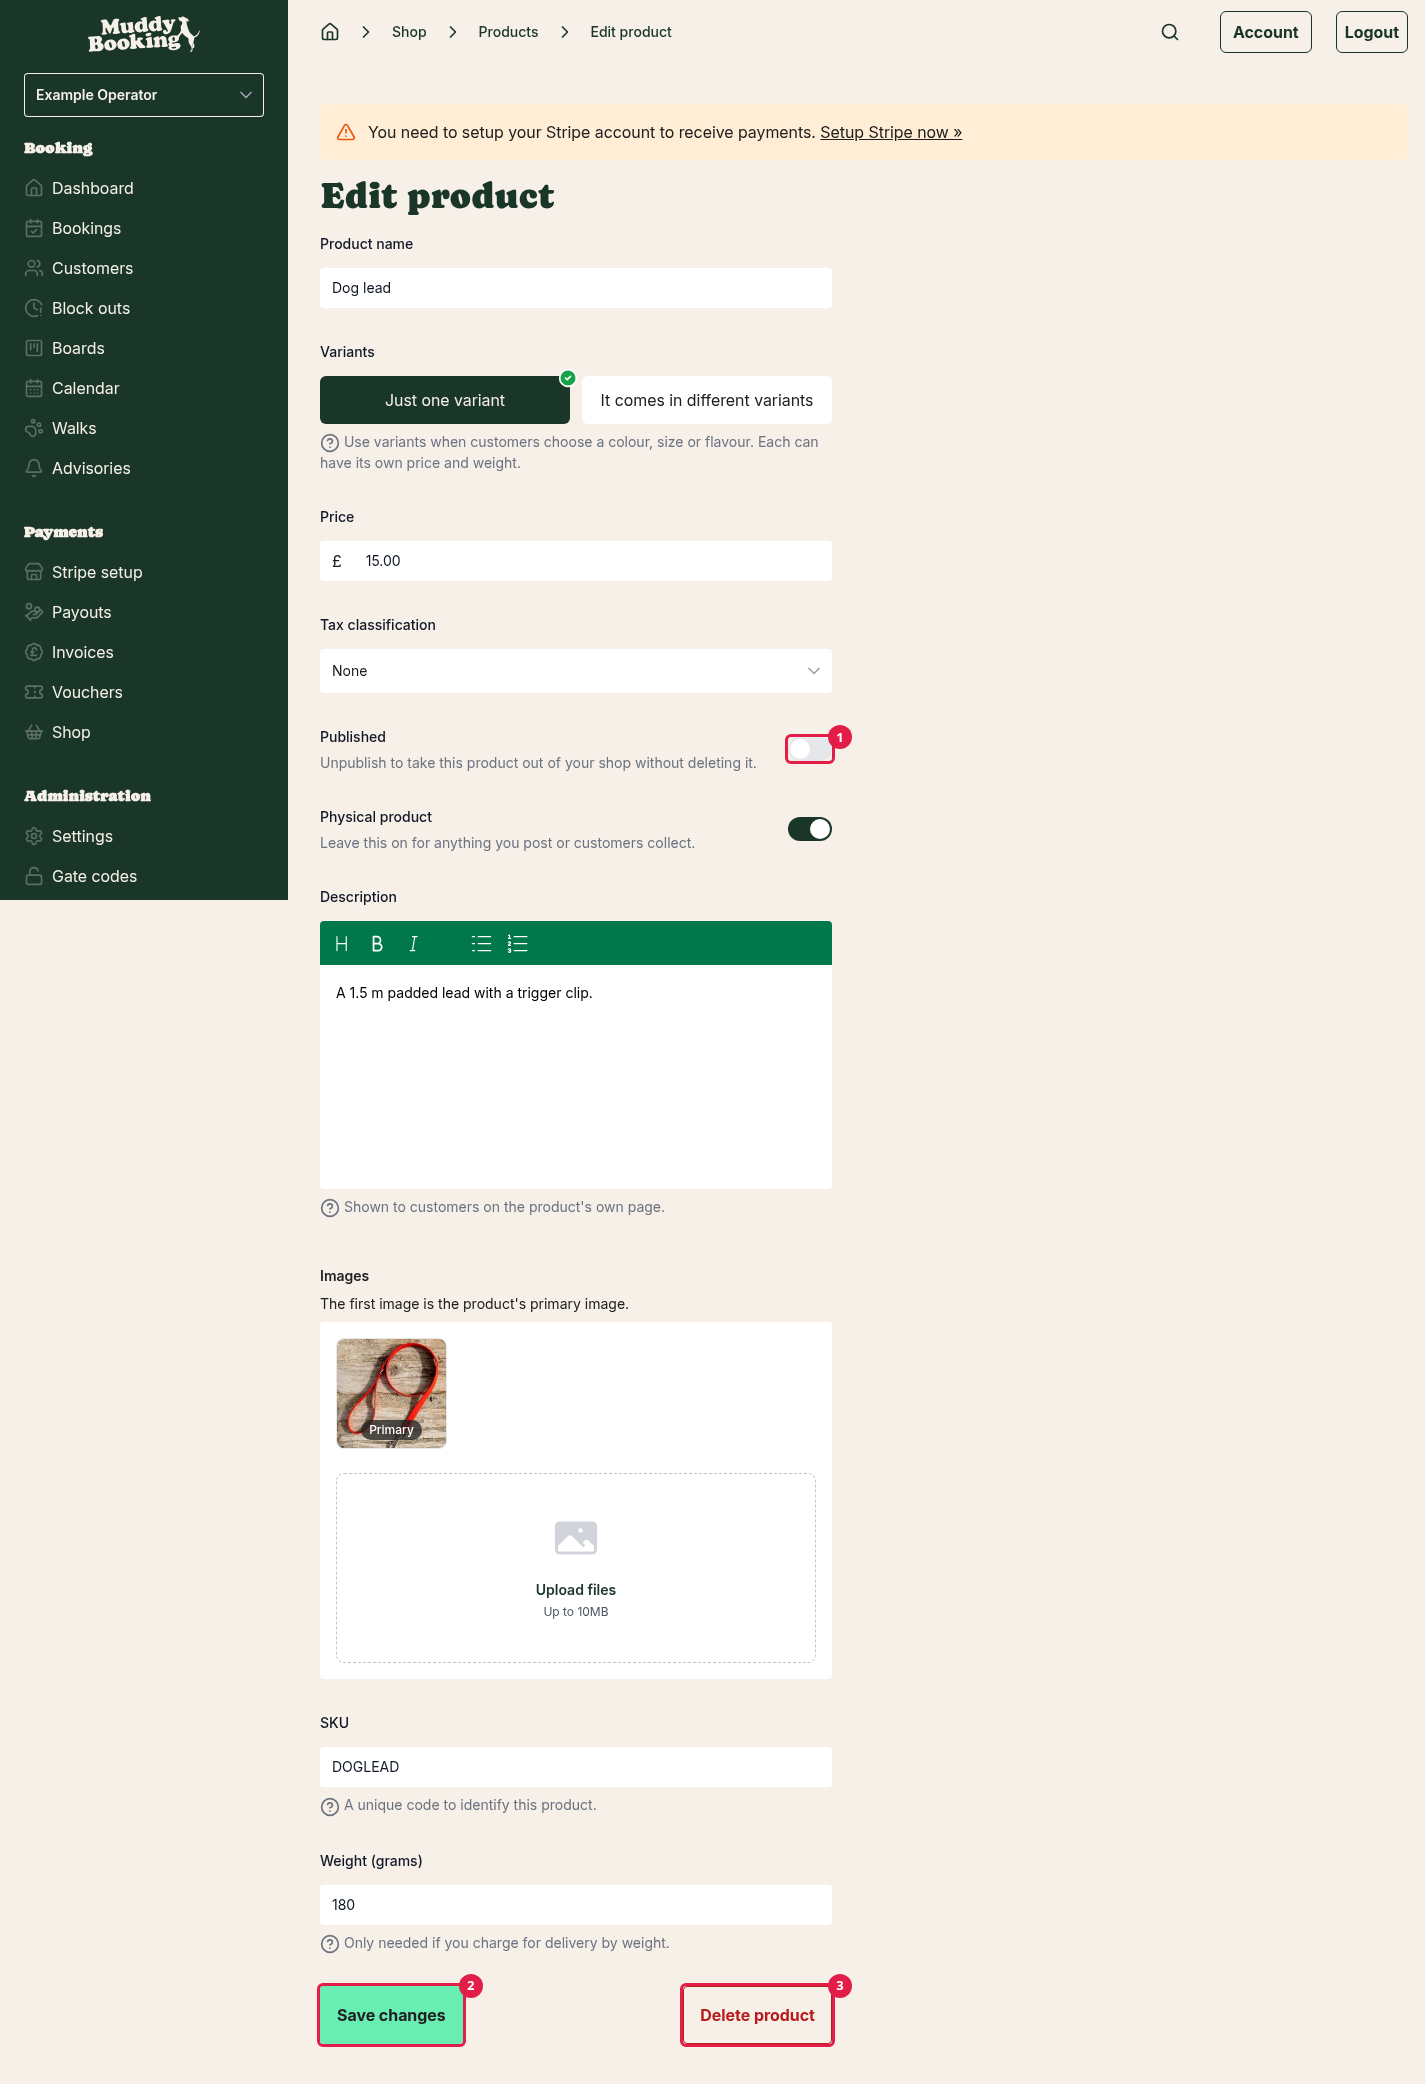
Unpublish it (recommended)
- On the Products page, click the product.
- Switch Published (1) off.
- Click Save changes (2).
The product disappears from your shop and from any baskets it's in. Everything else stays, so you can publish it again later.
Delete it
- On the Products page, click the product.
- Click Delete product (3).
- Click Delete it to confirm.
Warning: deleting a product is permanent and can't be undone. Its variants, and its place in any collections, go with it. Orders customers have already placed keep the product's name and details, but they're no longer linked to the product. Unless you're sure you'll never need it again, unpublish it instead.
Products not in a collection
If you use collections, a product that isn't in any collection only appears under More products at the end of your shop. Muddy warns you about this (1) when you edit the product. See Organising your shop with collections.