Finding your orders
- Click Shop in the left-hand menu.
- Click Orders.
The Orders page opens on Awaiting fulfilment. This is your to-do list: every order that still has something to send or hand over. Once everything on an order has gone out, it drops off this list.
The list also includes orders whose payment is still clearing, such as a Direct Debit, so check an order's Payment status before you send it.
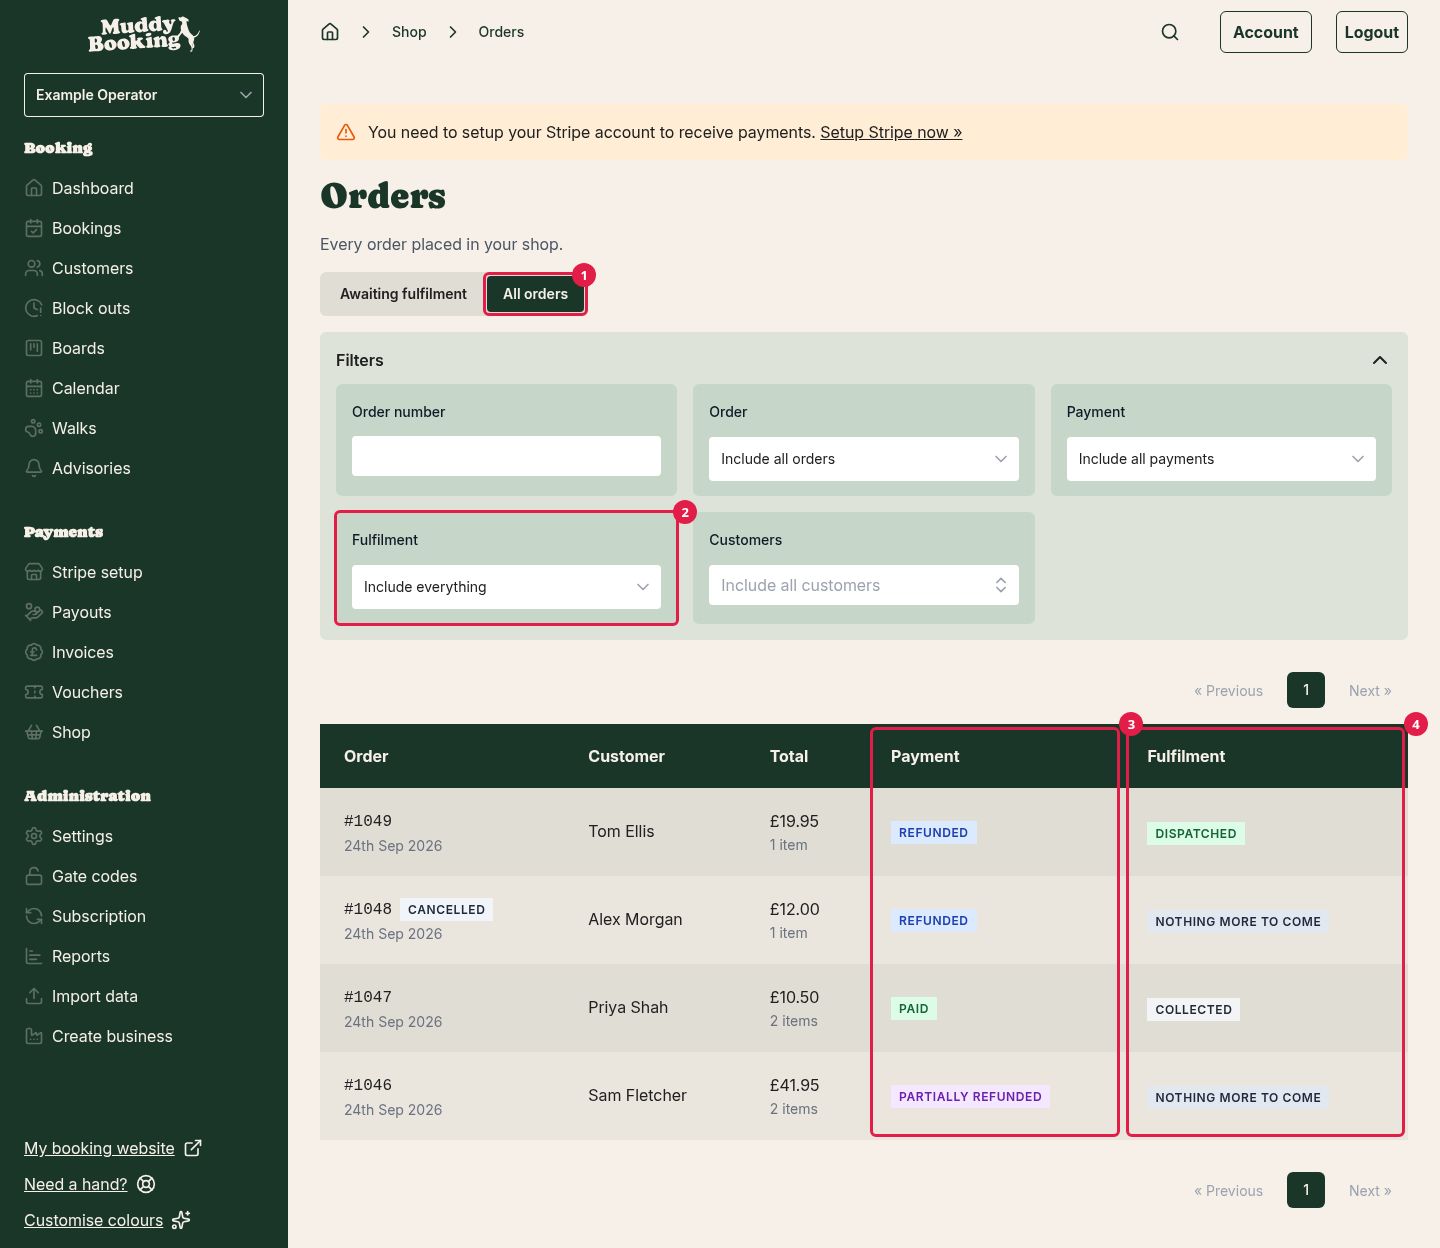
Switch to All orders (1) to see everything, including finished and cancelled orders.
Click Filters to filter orders by Order number, by customer, by Order status (placed or cancelled), by Payment, and, under All orders, by Fulfilment (2). Customers who start a checkout but never pay don't appear here.
You'll also get a New shop order email each time a customer pays for an order, unless you've switched it off in your notification preferences.
What the statuses mean
Each order has a Payment (3) status and a Fulfilment (4) status.
Payment:
- Paid: the order is paid in full.
- Unpaid: nothing has been paid yet.
- Partially paid: some of the order is paid.
- Refunded or Partially refunded: you've given back all or some of the money.
Payment pending means a payment has started but hasn't finished yet, such as a Direct Debit that's still clearing. A Direct Debit can take a few working days to clear.
Fulfilment:
- Awaiting dispatch: ready for you to send.
- Awaiting preparation: the customer is collecting, and you haven't got it ready yet.
- Ready to collect: you've told the customer it's ready.
- Partly fulfilled: you've sent or handed over some of the order, but not all of it.
- Dispatched: everything has been sent.
- Collected: the customer has picked it up.
- Nothing more to come: you've closed the order without sending everything (see below), or cancelled it.
- Nothing to dispatch: the order has nothing physical in it, such as an order for gift cards only.
Looking at an order
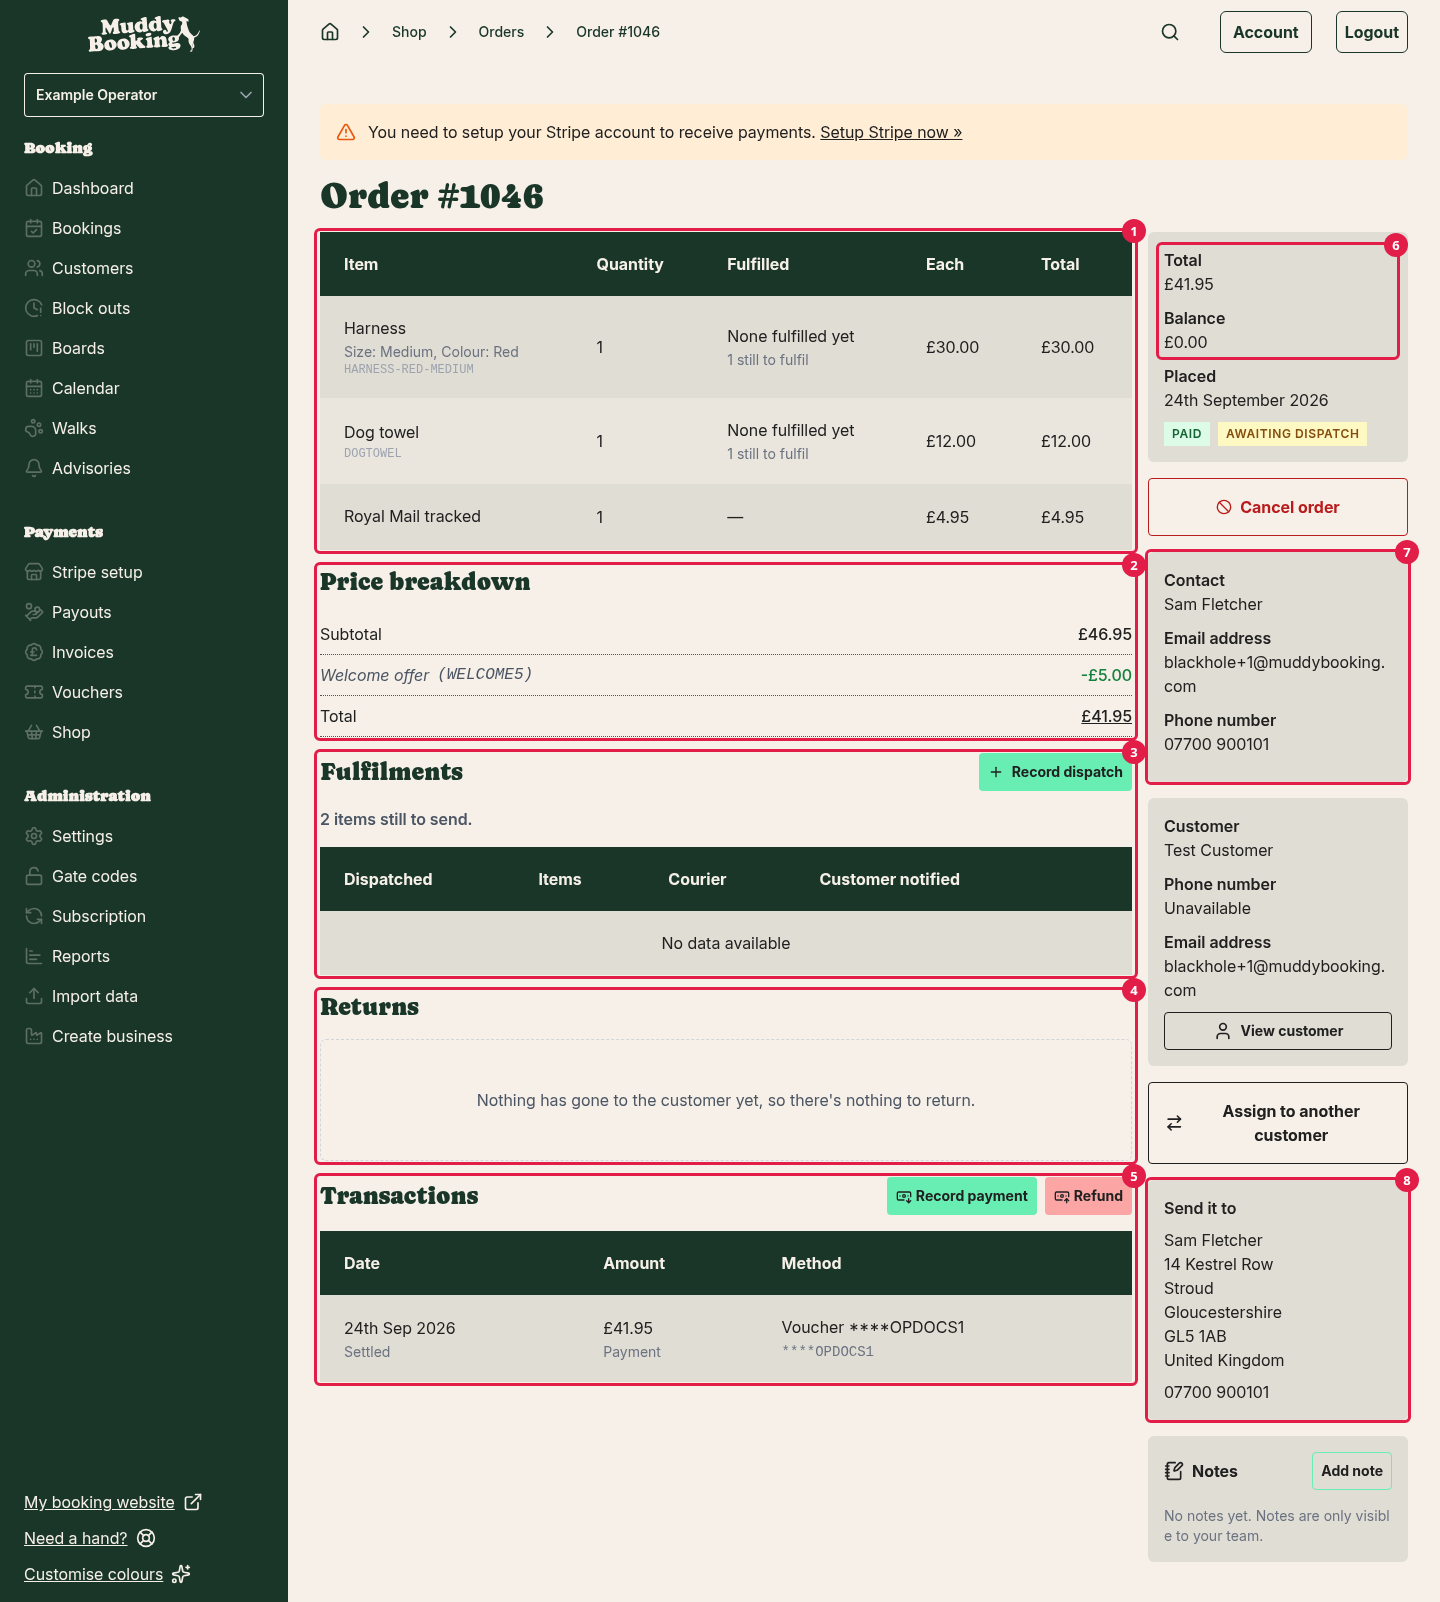
Click an order to open it. You'll see:
- A table of the items (1), with how many were ordered and how many have been sent.
- Price breakdown (2): shown if the order had discounts.
- Fulfilments (3): what you've sent or handed over so far.
- Returns (4): anything the customer has sent back.
- Transactions (5): payments and refunds.
On the right, you'll see the Total, the Balance (6), the customer's Contact (7) details, and the delivery address under Send it to (8).
Sending an order
When you post an order, record it in Muddy. This keeps your to-do list accurate and lets the customer know it's on its way.
- Open the order.
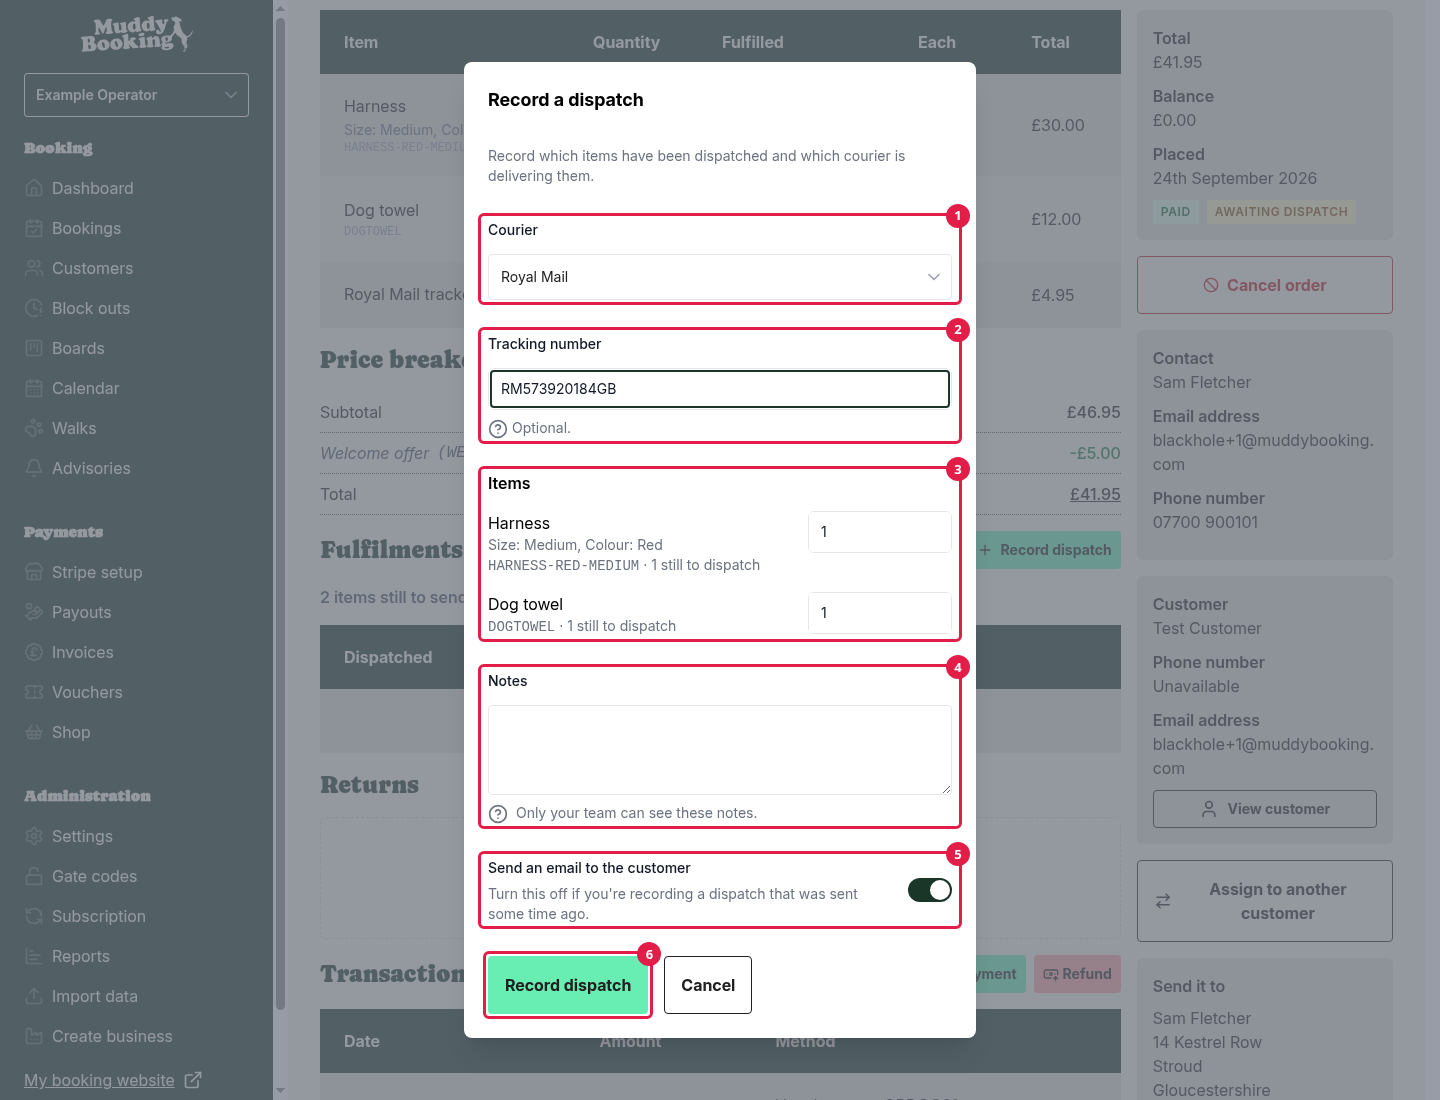
- Under Fulfilments, click Record dispatch.
- Choose the Courier (1), such as Royal Mail or DPD. If yours isn't listed, choose Other courier and type its name under Courier name.
- Enter the Tracking number (2), if you have one. For the carriers listed, Muddy turns it into a tracking link for the customer.
- Check the Items (3). Every item still to send is filled in for you.
- Add any Notes (4). Only your team can see these.
- Leave Send an email to the customer (5) switched on, so they know it's coming.
- Click Record dispatch (6).
Sending part of an order
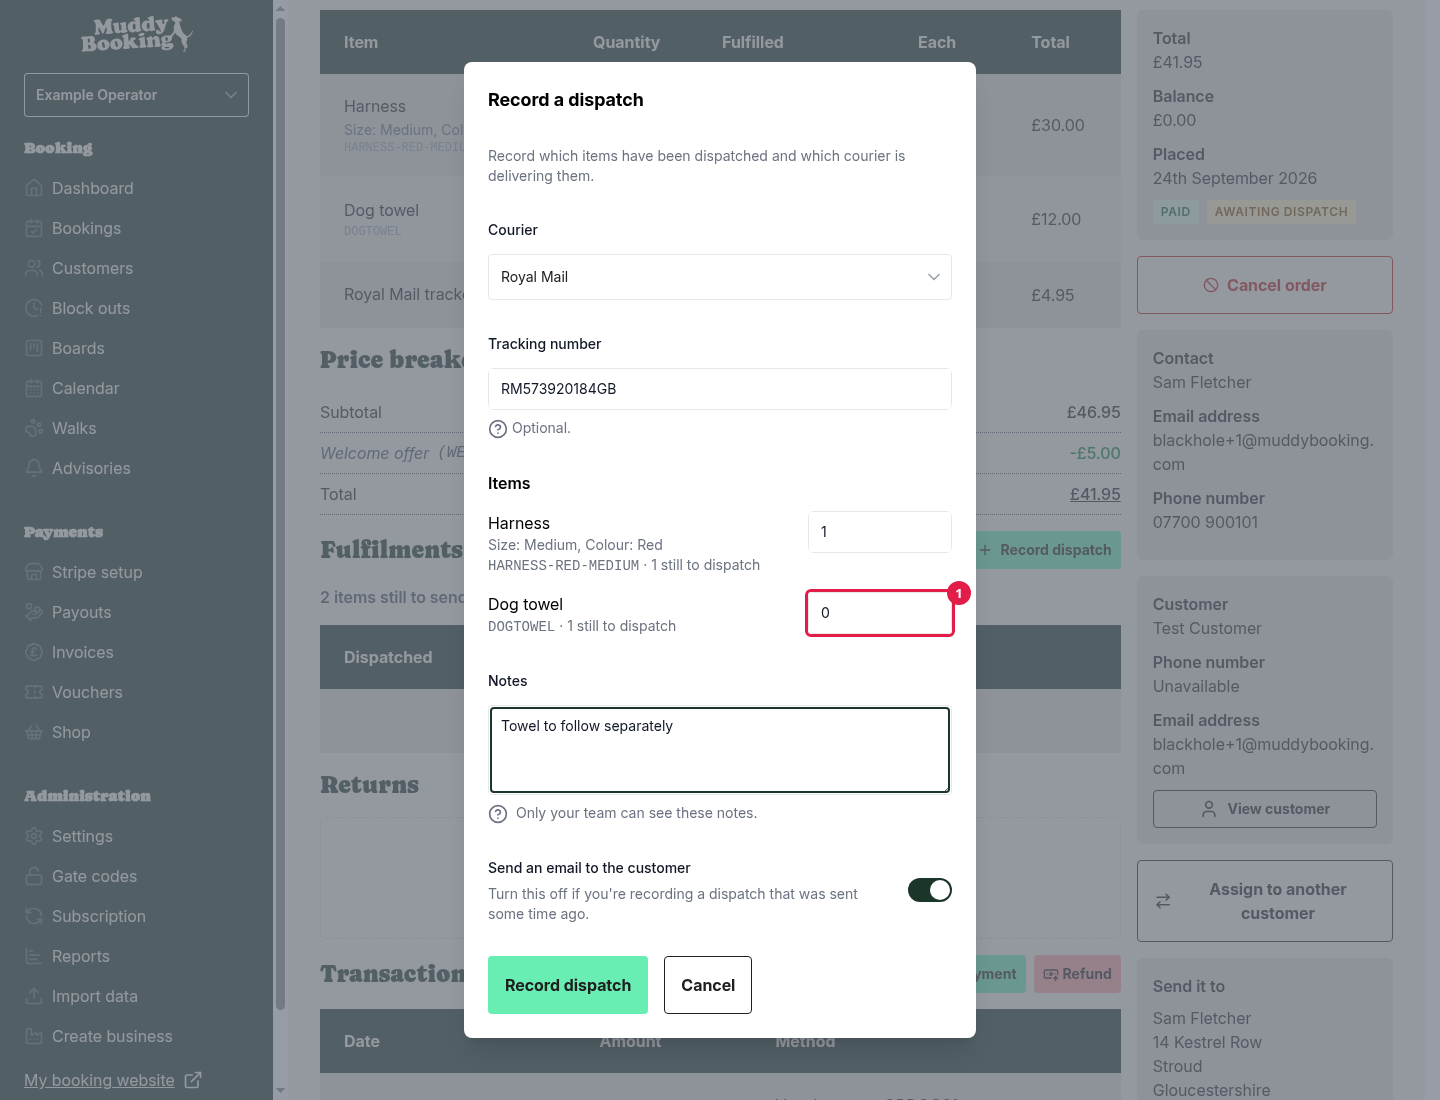
If you can't send everything at once, lower the quantities under Items to match what's in this parcel. Set anything you're not sending to 0 (1). The order shows as Partly fulfilled, and the email tells the customer what's in this parcel and what's still to come. Record another dispatch when you send the rest.
Recording something you sent earlier
If you're catching up on parcels you sent a while ago, switch off Send an email to the customer before you click Record dispatch. You can send the email later from the dispatch's row if you change your mind.
Removing a dispatch
If you recorded a dispatch by mistake, click the bin icon on its row, then Remove it. Its items go back to being still to send.
You can't remove a dispatch once the customer has been emailed about it. Contact the customer to put things right instead.
Collection orders
If the customer chose to collect their order, the steps are a little different.
When the order is ready
- Open the order.
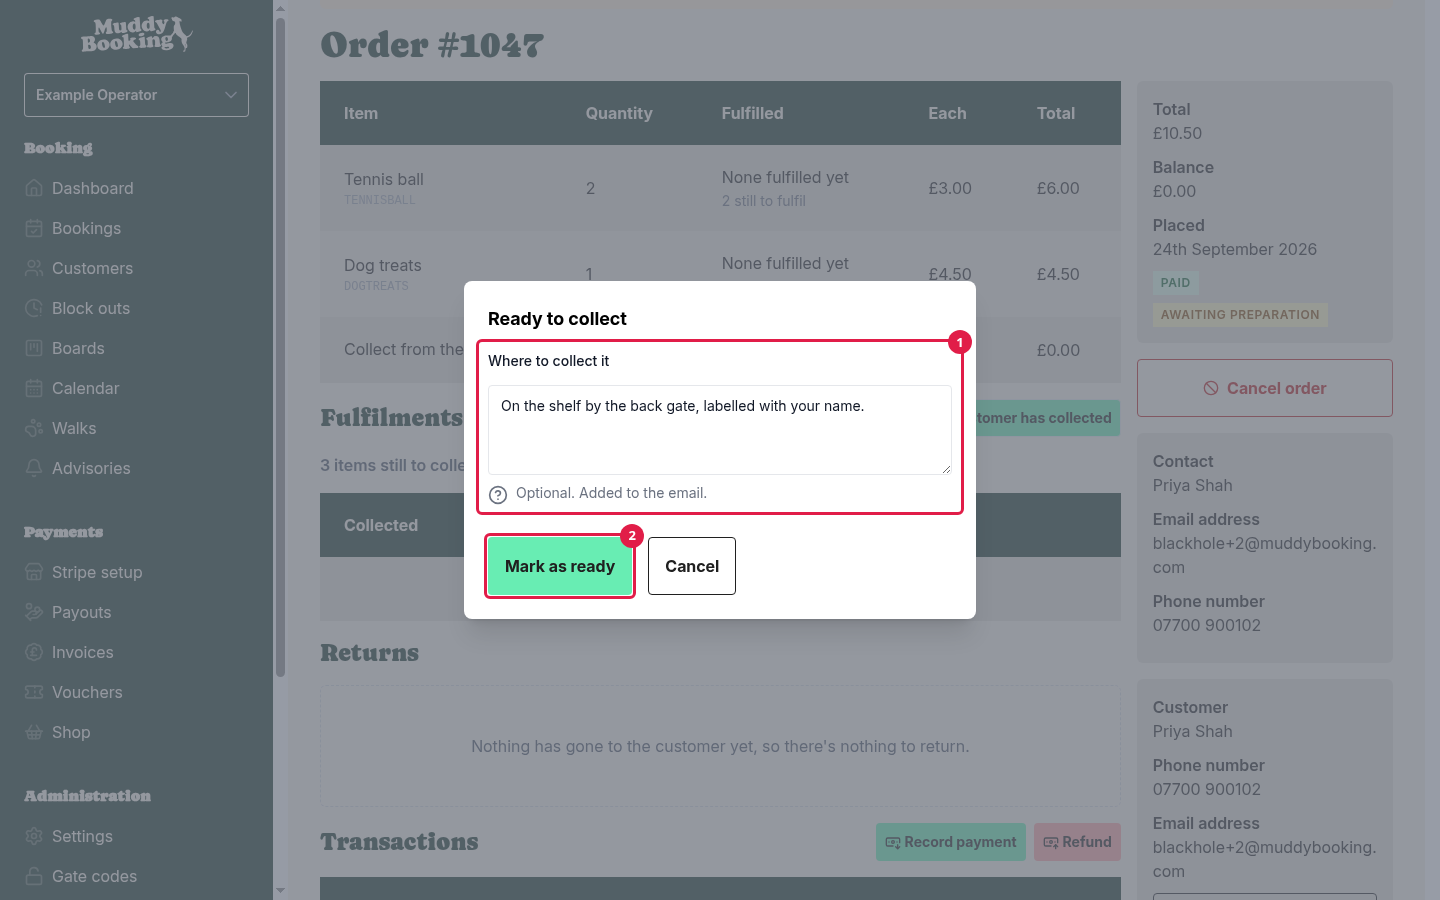
- Click Ready to collect.
- Add anything the customer needs to know for this order under Where to collect it (1), such as a locker number or a code. This is optional. It's added to the email, alongside your usual collection instructions.
- Click Mark as ready (2).
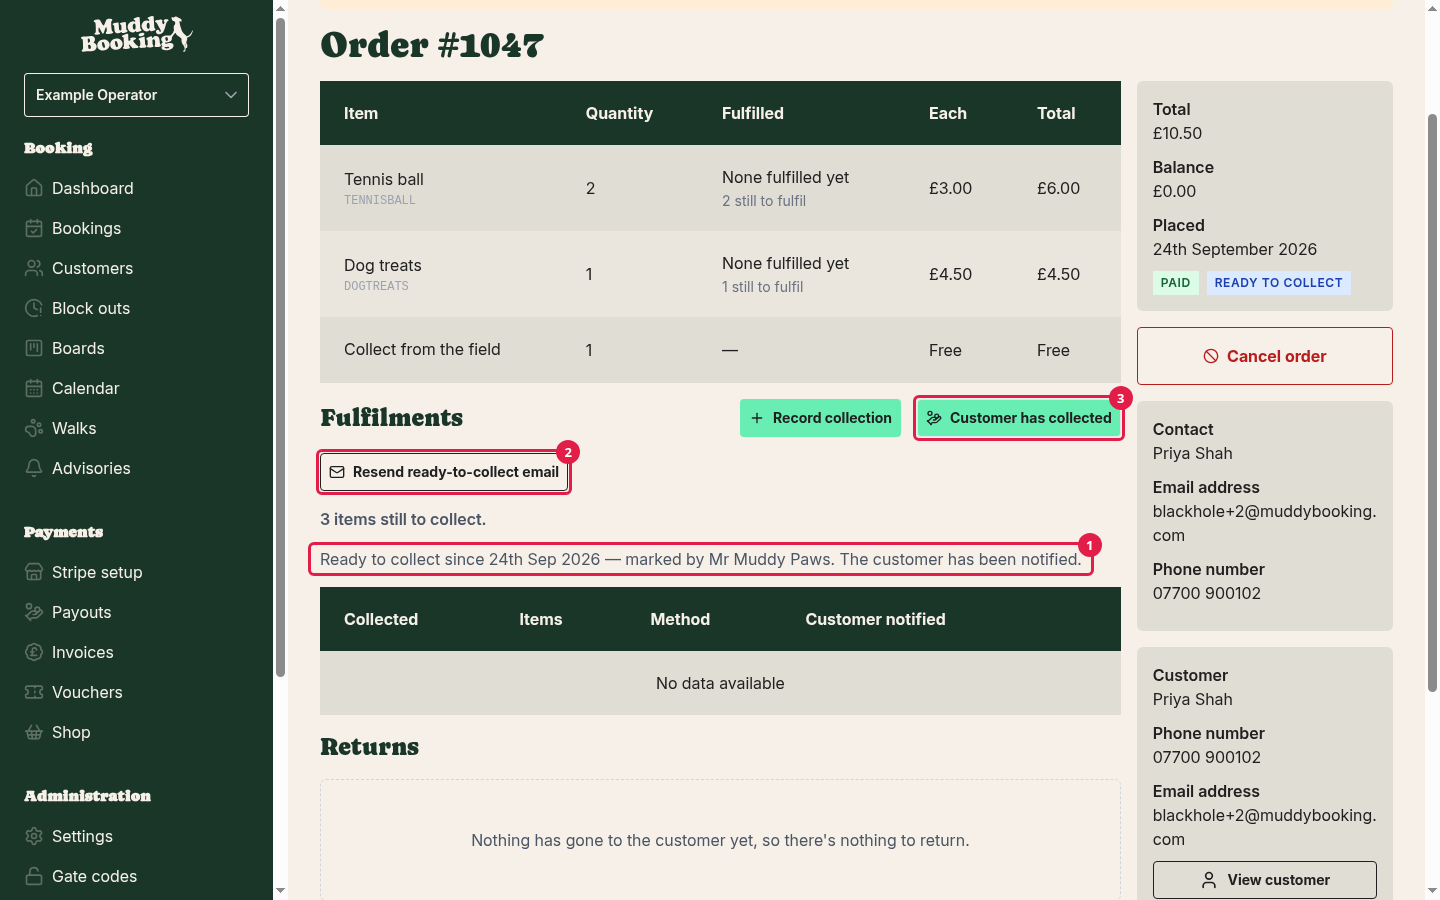
The customer is emailed straight away to say their order is ready (1).
If you need to correct the details, such as a wrong locker code, click Resend ready-to-collect email (2), update them, and click Resend email.
When the customer picks it up
- Open the order.
- Click Customer has collected (3).
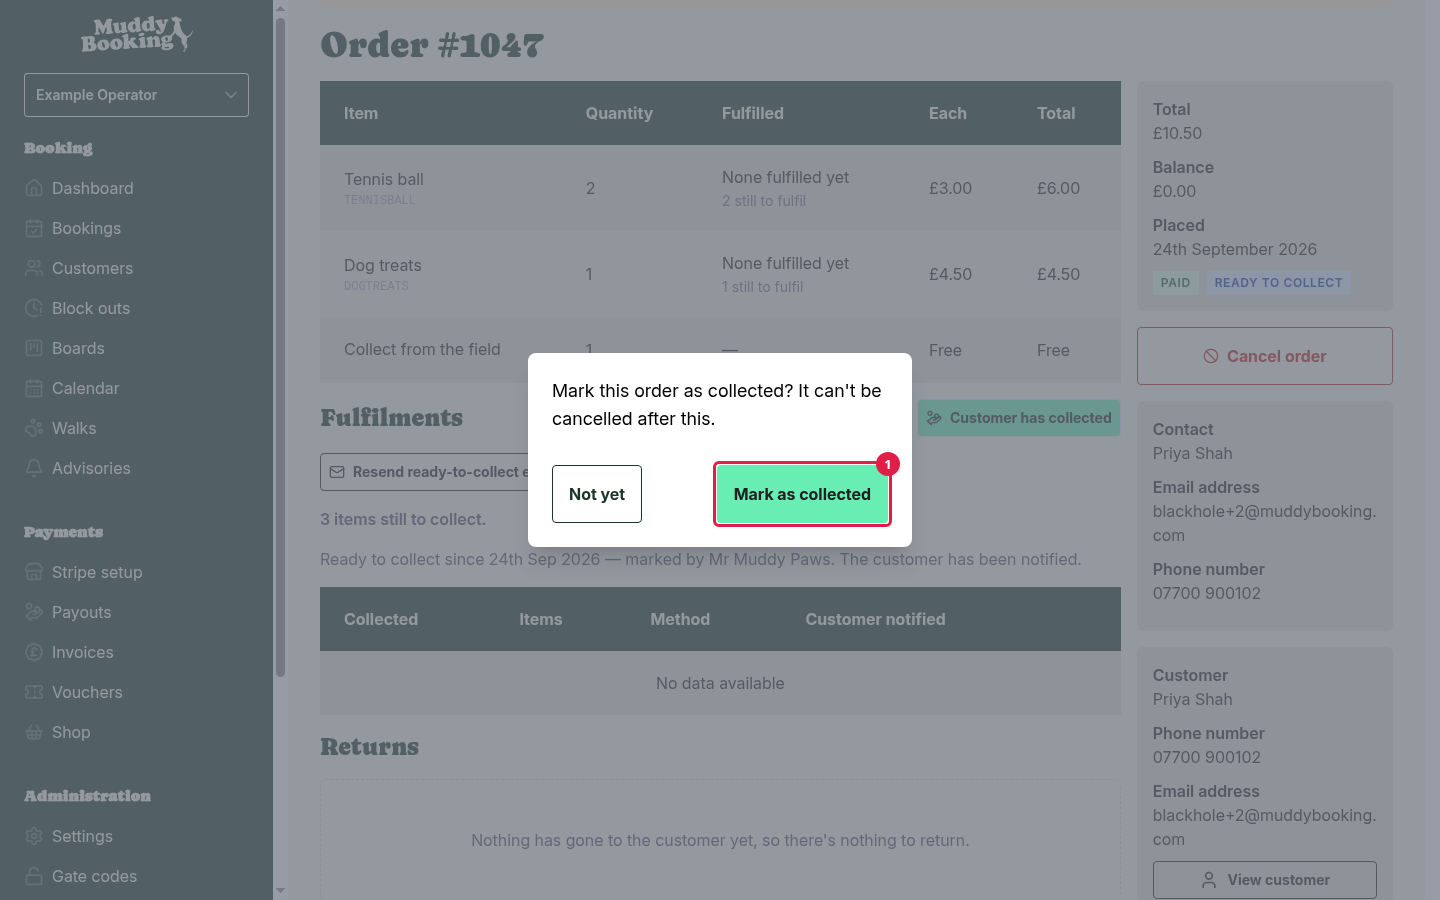
- Click Mark as collected (1) to confirm.
This doesn't email the customer. If you'd like to send them a confirmation, click Send handover email (1) on the collection's row, then Send it.
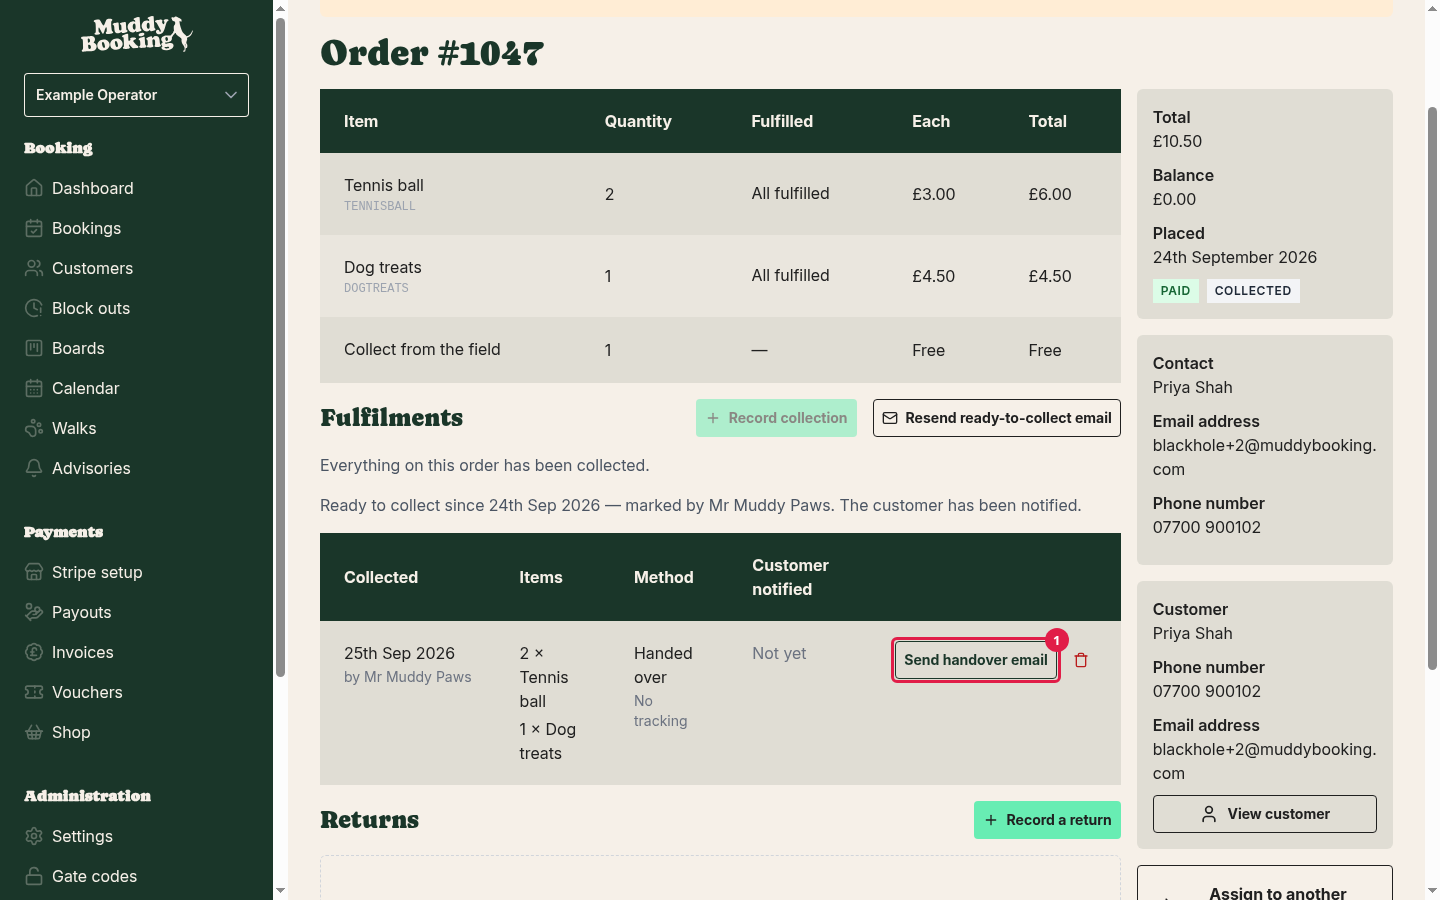
Note: once an order has been collected, it can't be cancelled.
When the customer collects part of an order
If the customer takes some of their order and comes back for the rest, record what they took:
- Open the order.
- Under Fulfilments, click Record collection.
- Under Items (1), enter how many of each item they took. Everything still to collect is filled in for you, so lower the quantities to match.
- Leave Send an email to the customer (2) switched on if you'd like to confirm what they've collected.
- Click Record collection (3).
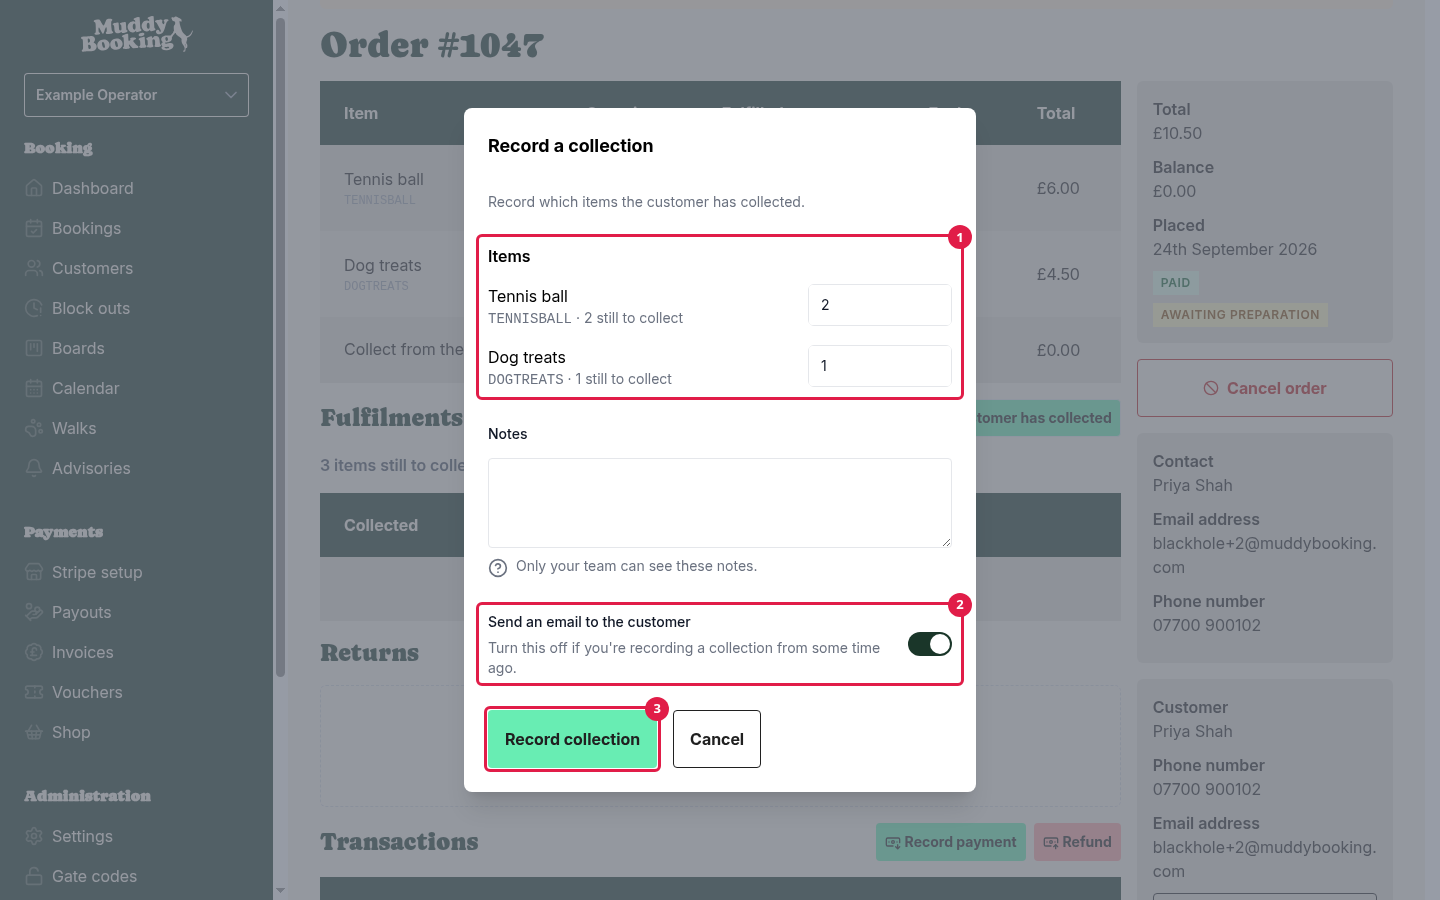
There's no carrier or tracking number to fill in. The order shows as Partly fulfilled until everything has been collected.
Collection points where customers help themselves
If the collection point has Customers help themselves switched on, for example because you leave orders in a locker (see Offering collection), marking the order ready also counts as handing it over. When you click Ready to collect, the pop-up is titled Left for the customer, and you enter Where to find it instead. There's no separate Customer has collected step, and no handover email. After that, the order can't be cancelled.
Closing an order without sending everything
Sometimes you can't send the rest of an order. For example, an item might be discontinued, or the customer might tell you they no longer want the rest. Once part of an order has gone out, you can't cancel it, but you can close it.
- Open the order.
- Under Fulfilments, click Nothing more to send (or Nothing more to collect on a collection order).
- Check the message (1), then click Nothing more to send (2) again to confirm.
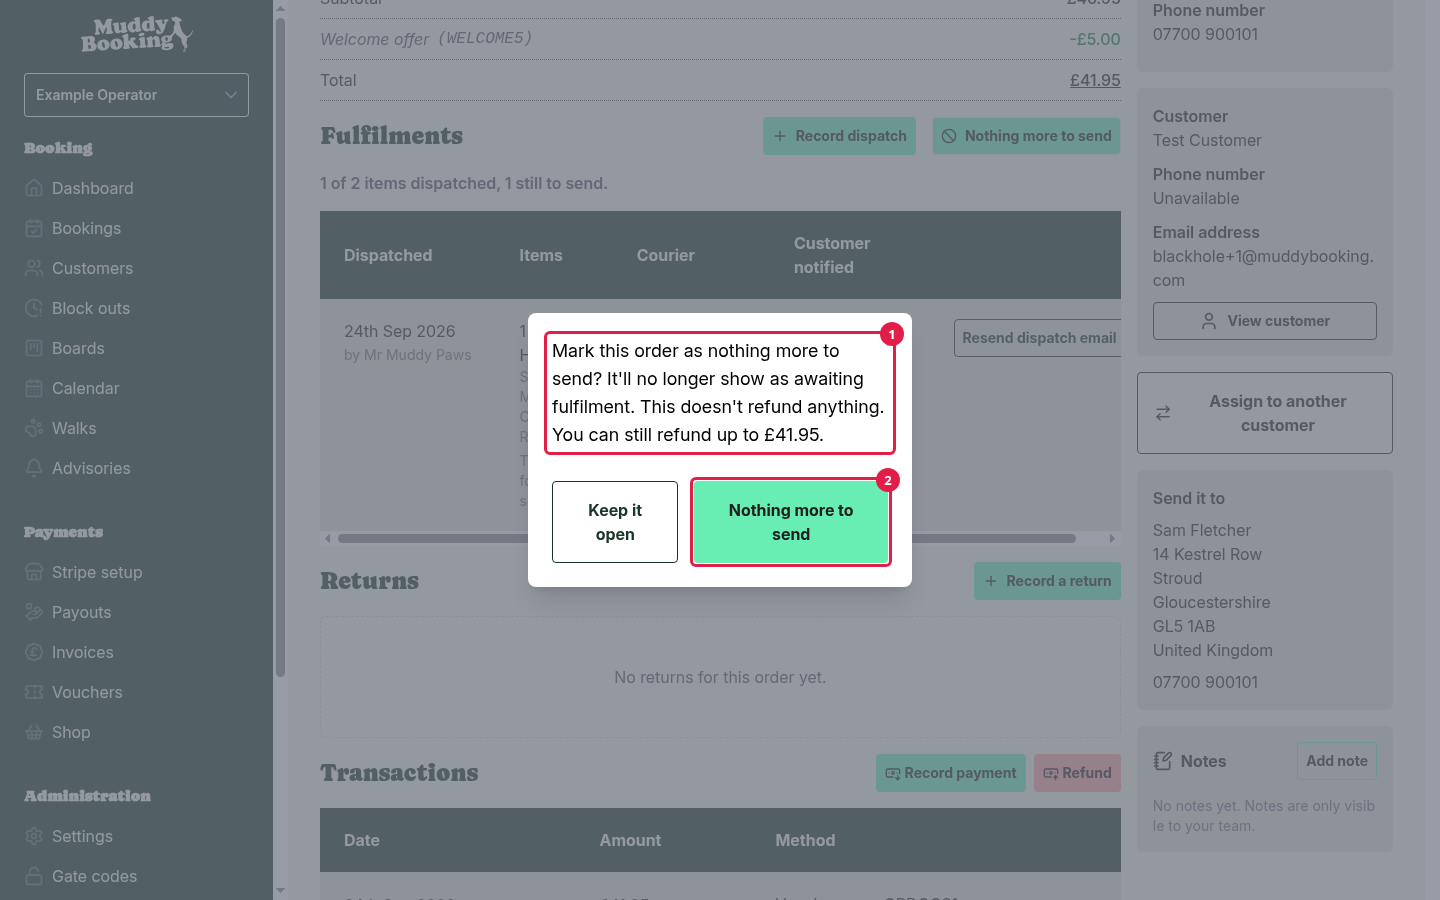
The order comes off your to-do list. No money moves when you do this. The confirmation tells you how much could still be refunded. If the customer should get money back for the items they didn't receive, refund it separately (see Refunding without a return below).
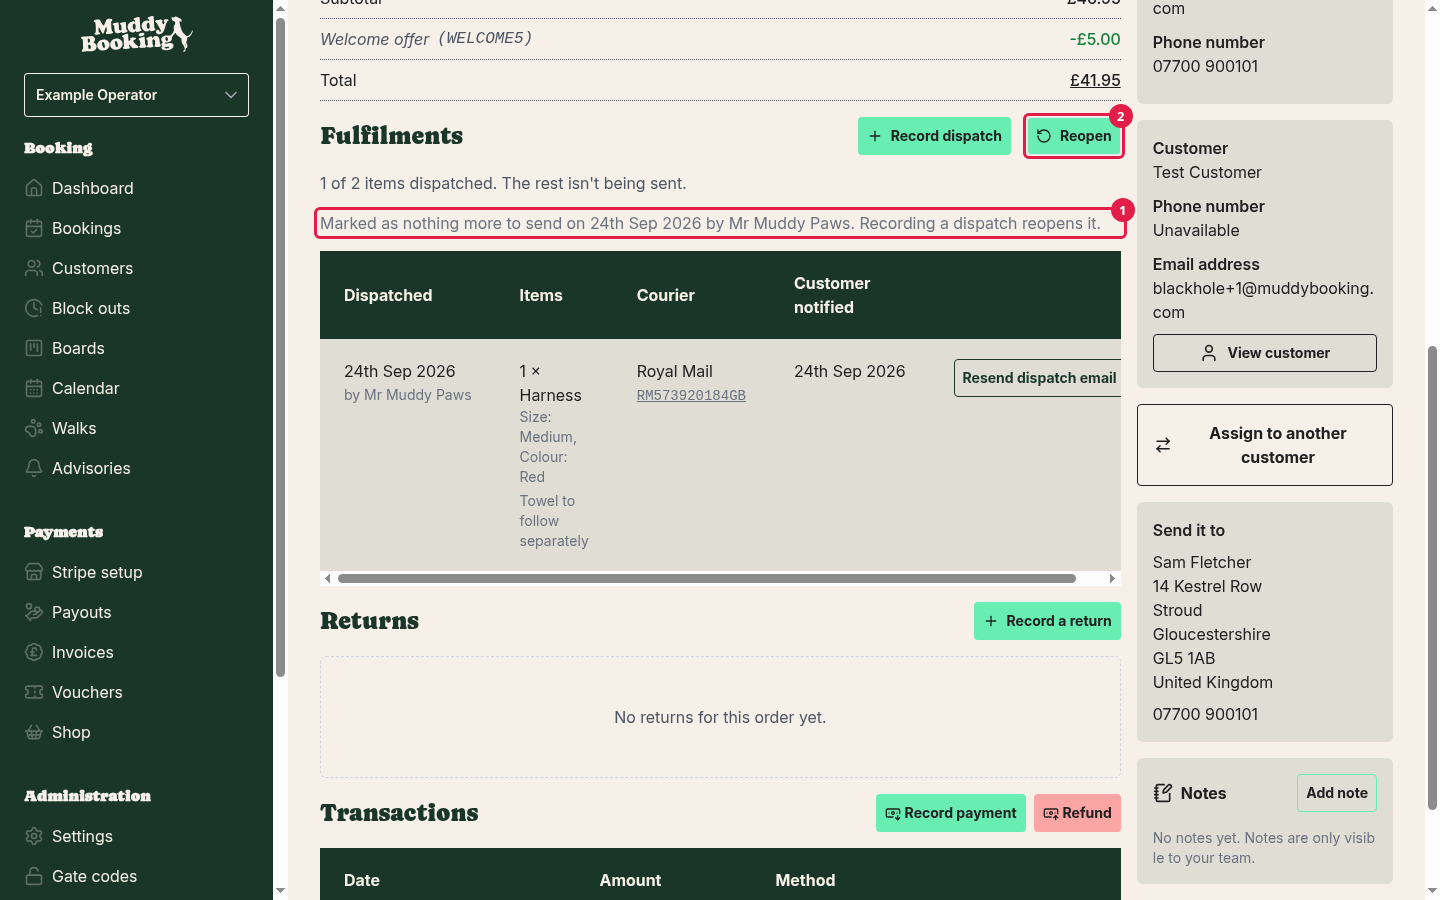
If you change your mind, click Reopen (2). Recording another dispatch also reopens it (1).
Cancelling an order
You can cancel an order until something on it has been sent or collected.
- Open the order.
- Click Cancel order.
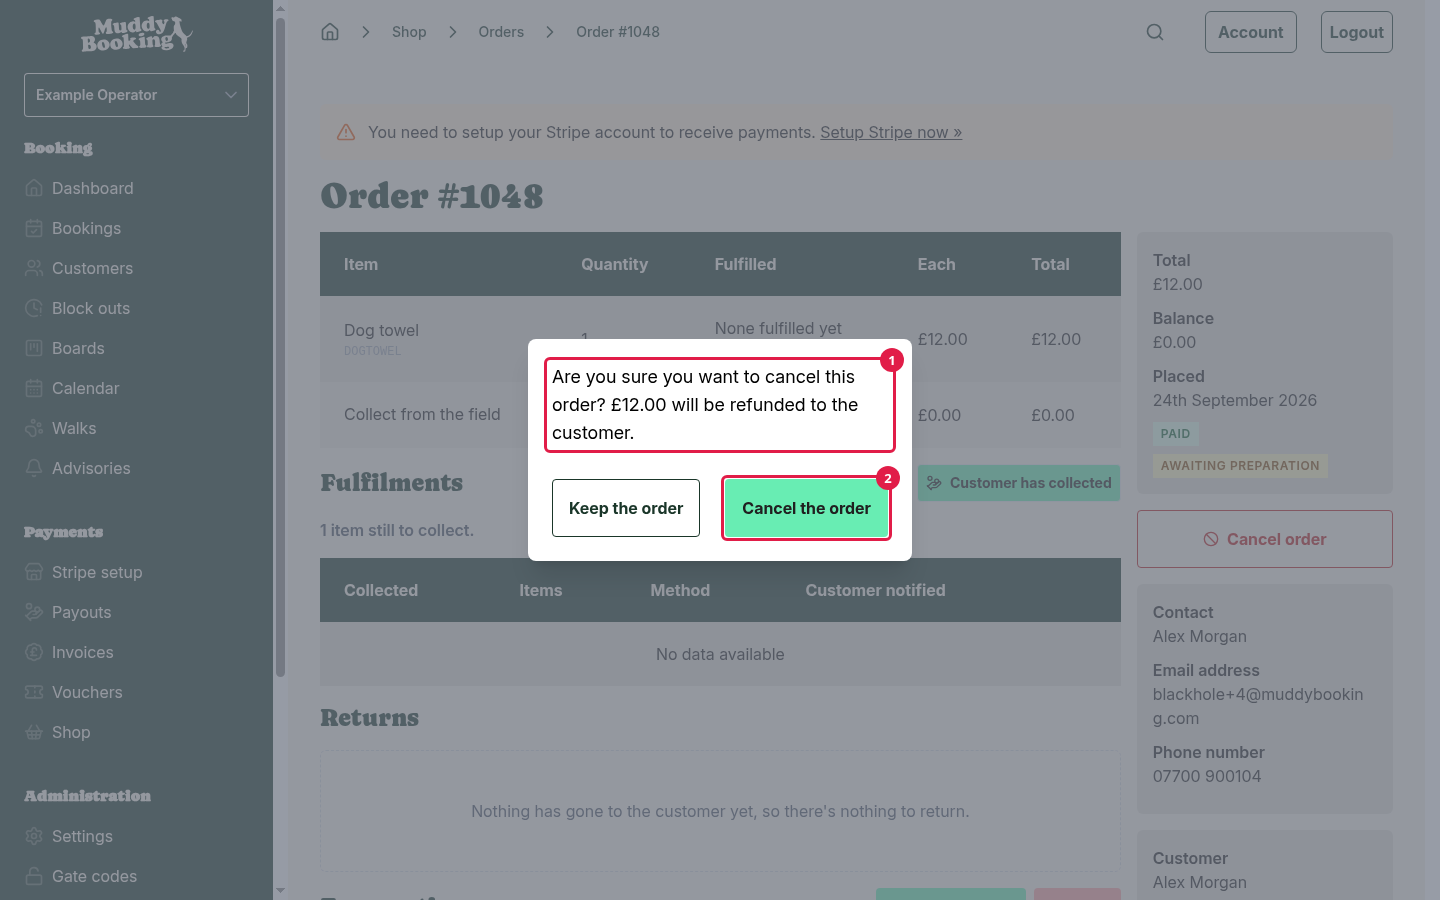
- Check the message (1). It tells you how much will go back to the customer.
- Click Cancel the order (2).
When you cancel an order, Muddy:
- Refunds everything the customer paid, back to where it came from.
- Puts the items back into your stock.
- Emails the customer to say the order has been cancelled.
- Cancels any gift cards on the order.
Warning: cancelling an order can't be undone.
You can't cancel an order:
- Once something has been sent or collected. Record a return instead, and refund against that.
- While a payment is still pending. Wait for it to finish or fail first.
- If a gift card on the order has already been spent.
Refunds take a few minutes to show on the order.
Returns
When a customer sends something back, record a return. You can only return items that have been sent or collected.
- Open the order.
- Under Returns, click Record a return.
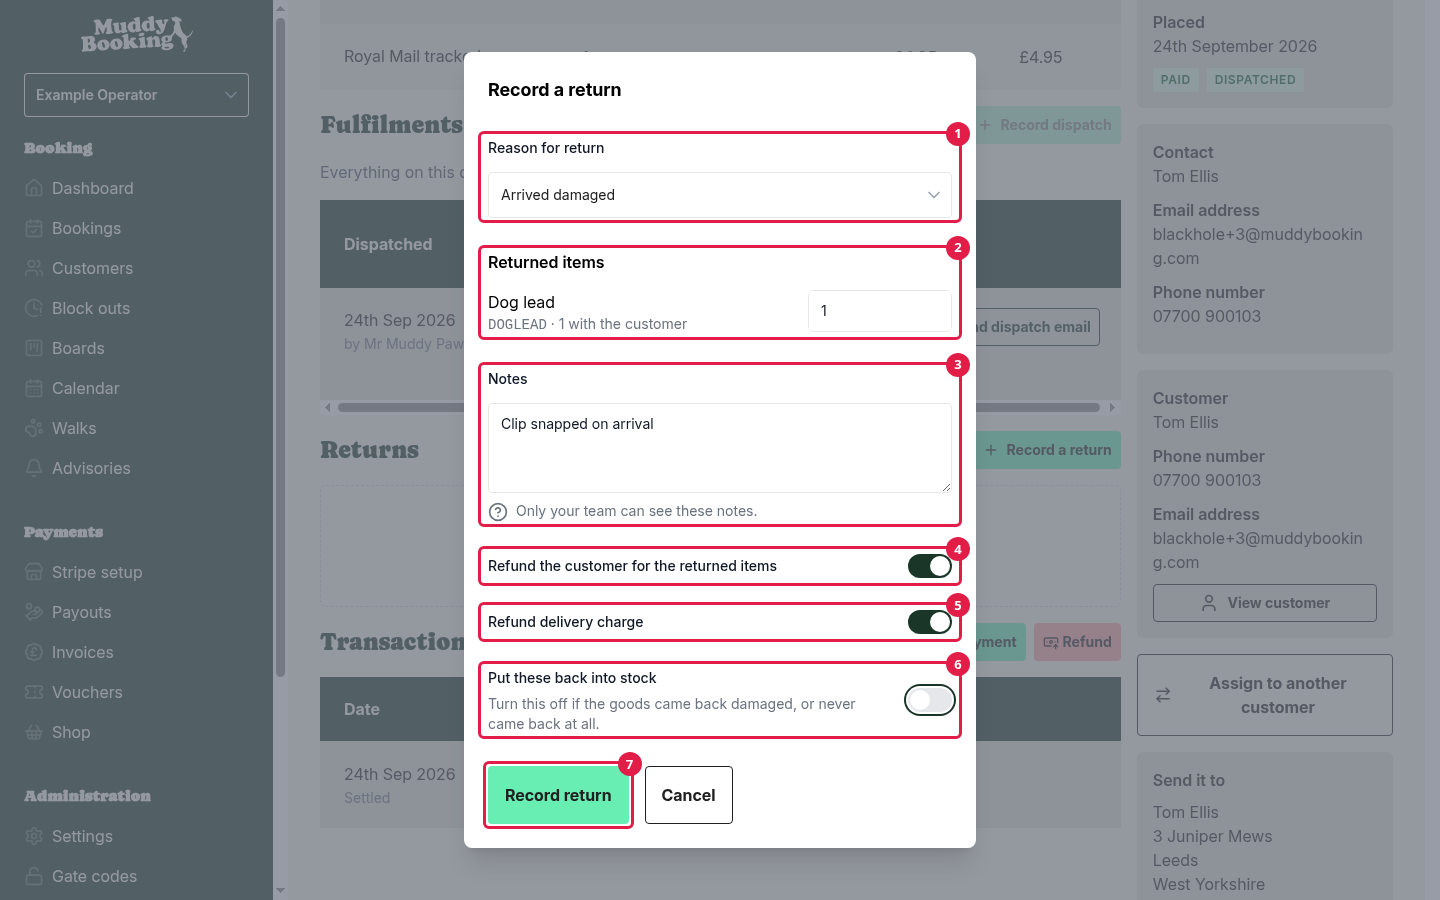
- Choose the Reason for return (1), such as Arrived damaged or Customer changed their mind.
- Under Returned items (2), enter how many of each item came back. You can return part of an order.
- Add any Notes (3). Only your team can see these.
- Decide whether to refund the customer now (4) (5) (see below).
- Leave Put these back into stock (6) switched on if the items can be sold again. Switch it off if they came back damaged, or never came back at all.
- Click Record return (7).
Refunding a return
When you record the return, switch on Refund the customer for the returned items to refund them straight away. The refund is the price the customer paid for those items.
If the order had a delivery charge, you can also switch on Refund delivery charge. The delivery charge can only be refunded once per order. This option only appears when you refund at the same time as recording the return. To refund delivery later, add it to the Amount yourself.
You don't have to refund straight away. You might want to wait until the items arrive back, for example. To refund later:
- Find the return under Returns.
- Click Refund.
- Check the Amount. It's filled in with the price of the returned items. You can change it, up to what's left to refund on the order.
- Click Refund.
Warning: the Refund button stays on a return after you've refunded it, as long as the order still has money left to refund. Check Transactions before you refund a return, so you don't refund it twice.
The customer gets an email when the refund goes through. Recording a return on its own doesn't email them.
Removing a return
If you recorded a return by mistake, click the bin icon on its row, then Remove it.
Warning: removing a return doesn't undo a refund that's already been made, and it doesn't take back stock that was put back. Check your stock afterwards, and correct it if you need to.
Refunding without a return
To refund money that isn't for returned items, such as for items you couldn't send, use the Refund button under Transactions.
The amount is filled in with the most you can refund. Lower it if you're only refunding part of the order.
Warning: refunds can't be undone.
Where refunds go
- Card payments go back to the customer's card. It can take a few working days to appear on their statement.
- Direct Debit payments go back to the customer's bank account.
- Voucher payments go back onto a voucher. Whether that's the original voucher or a new one depends on your voucher settings.
- Cash or bank transfer payments that you recorded with Record payment can't be refunded automatically. You'll need to pay the customer back yourself. If you cancel the order or refund a return, Muddy emails you a Manual refund required reminder.
If an order was paid partly by card and partly by voucher, the refund is shared between them, starting with the most recent payment.
Changing the customer on an order
Muddy links each order to a customer record. If an order ended up on the wrong record, for example because the customer checked out as a guest with a different email address, you can move it.
- Open the order.
- Click Assign to another customer (or Assign to customer if it has none).
- Search for the right customer (1).
- Click Assign customer (2).
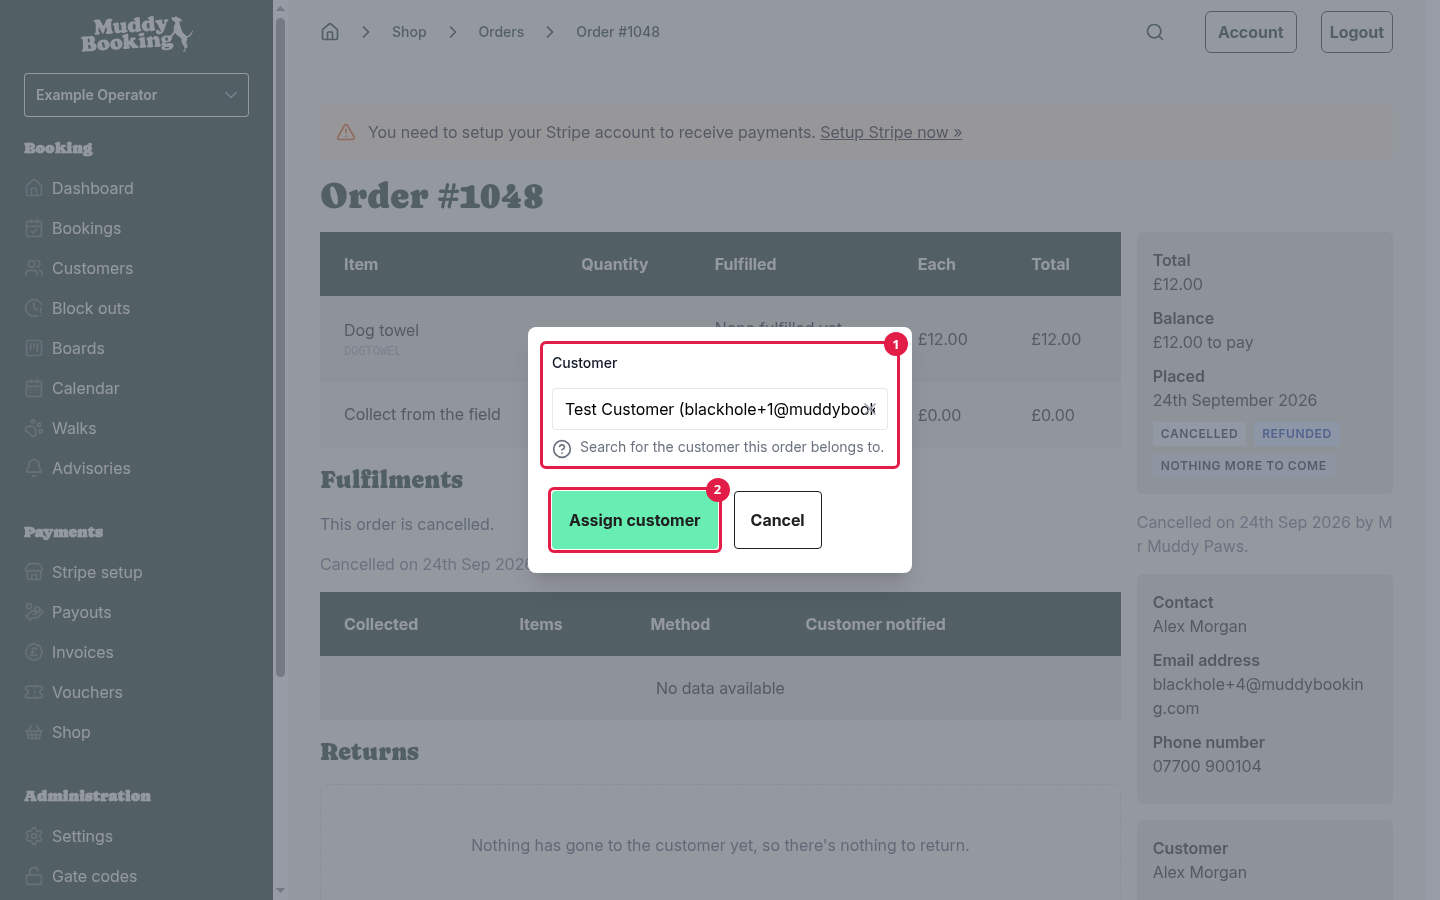
The order moves to that customer's record and their Your orders list. The contact details on the order don't change, so emails about this order still go to the email address the customer used at checkout.
Emails customers receive
Muddy emails customers automatically at each step. These come from your business, not from Muddy.
- Your order is confirmed: when they've paid.
- Your order is on its way: when you record a dispatch (unless you switch the email off).
- Your order is ready to collect: when you mark a collection order as ready.
- Your order has been collected: when you record a collection with the email switched on, or click Send handover email.
- Your order has been cancelled: when you cancel the order.
- Refund processed: each time a refund goes through.
Order emails include a link to the order. Customers can open it on the device they ordered from, or by signing in.